How to Add a Widget in WordPress
Table of Contents
Beginners Tutorial on How to Add a Widget in WordPress. Easy tutorial on Installing and removing widgets onto different parts of your page or blogs.
Why You Should Have Widgets On Your WordPress Site
Widgets help every one to navigate seamlessly through your blog/site and have a good experience. Leading them to spend more time on your site and potentially return back to check content more regularly. You can add anything from social links, meta logins, Discord and YouTube content, embed videos and much much more.
You can also add sepperate menus and widgets to display your latest blog posts.
How to Add a Widget in WordPress
How to Add a Widget in WordPress Guide
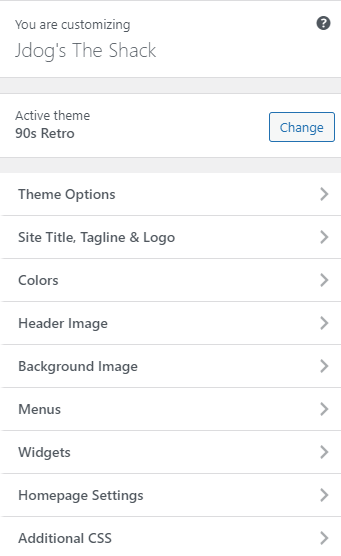
To get started, heads to your WordPress dashboard. You can either go to Appearance on the left hand side of the dashboard and then using the drop down menu select Customize.
Or when on your site tap the Customize button on the top left of your page next to a paintbrush.
Now from here navigate down to Widgets.

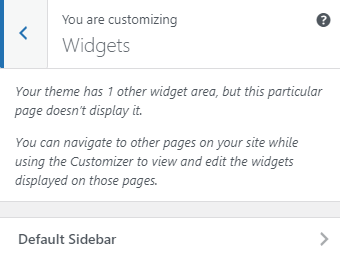
Once you select widgets you can choose what part of the page you want to add the widget too. Themed pages will usually have a structure setup for you to add widgets onto the page in certain locations.

For example in the picture above the theme only supports widgets on the Default Sidebar.
How to Add a Widget in WordPress Finishing Up
Now all you need to do is the select the widget you want to add, you have any options such as search, meta, social media icons, links, latest posts, custom html and much more.
Once selected simply give it a title and depending on the widget just make sure to complete any information it needs and your done. To remove a widget you can select remove, situated next to the done button.
Alternatively you can press the highlighted button on the widget if you are in customization view on your page. And this will bring you up to the option for that specific widget.
Related Articles – Home Page – Blog Page – Theme – Settings – SEO – GDPR – Embed


