How to Setup SeekaHost Mail Records in cPanel
Table of Contents
To achieve your business email reach your customer or clients, keeping an email account ending with @domain-name would help you reflect that. At SeekaHost, we have dedicated business email hosting service for business users to have first point of contact with new customers by configuring few mail records in domain without much complication like other email service provider have.
How does the email service process work? Let’s figure out with the SeekaHost Dedicated email hosting service!
Importance of Dedicated Business Email Hosting:

When you use the hosting provided email account, the mail space will be shared with the website resources. If you are uploading scripts, doing heavy performance, or taking backups, it will be stored in your file manager which will consume more disk space. If this happens, both your website or email services may be affected. To make sure both functions continue properly without downtime, it’s advisable to use a separate business email hosting for your website.
Along with that, we have to make sure that either of the process doesn’t affect the other one. If there is any issue with the email such as spam, blacklist, bulk mail spoofing, etc or issue with website such as downtime, phishing, critical error, etc it will make entire cPanel account down since you can only able to access hosting mail account through the website cPanel only.
Prerequisites:
1. Purchase an Email Hosting Service with us.
2. Once purchased the email hosting, you will receive mail records to configure in DNS Management for the domain. Following records will be received in the mail.
- MX Record
- CNAME Record
- TXT Record
NOTE: To update DKIM record, contact our support team who will help you with the update for this record.
Process to Update SeekaHost Mail Records:
Step 1: Log into the cPanel of the website.
Step 2: Search “zone editor” and click “Manage” button to edit the dns records.

NOTE: Find the mail records in the welcome mail with the subject as ‘Mail Hosting Order Details’.
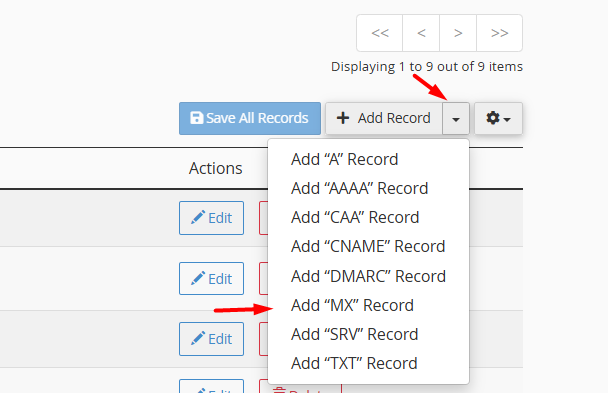
Step 3: You need to delete the old MX records and update the new MX record we have provided in the mail. Click the ‘Down arrow’ option next to ‘Add Records‘ and click ‘Add “Mx” record’.

Update the mx record values as follow,
- Name: Enter the domain name
- Record field (Priority): Update value as 10.
- Record field (Destination): Paste the MX Value
Step 4: Click the ‘Down arrow’ option next to ‘Add Records‘ and click ‘Add “CNAME” record’.

Update the CNAME record values as follow,
- Name: Enter the domain name
- Record field: Paste the CNAME Value
Step 5: Choose the option Add “TXT” record’ by following the above step.

Update the TXT record values as follow,
- Name: Enter the domain name
- Record field: Paste the TXT Value
Once all the above mail records are done, click “Save All Records” button at top to complete the update. You can check the dns records propagation in dns checker third party tool for your reference.
Step 6: To update the DKIM record, please “open ticket” seekahost client area on your account and request for DKIM record update. Our support team will generate and update the records for you.
NOTE: If you are using any other mx or cname or txt records of other email providers, please remove and update our records to propagate correctly.
If you would like to add the mail records of our hosting for the domain with us, you can login to seekahost client area for the domain and manage the mail records in the domain DNS management option.
Additional Step:
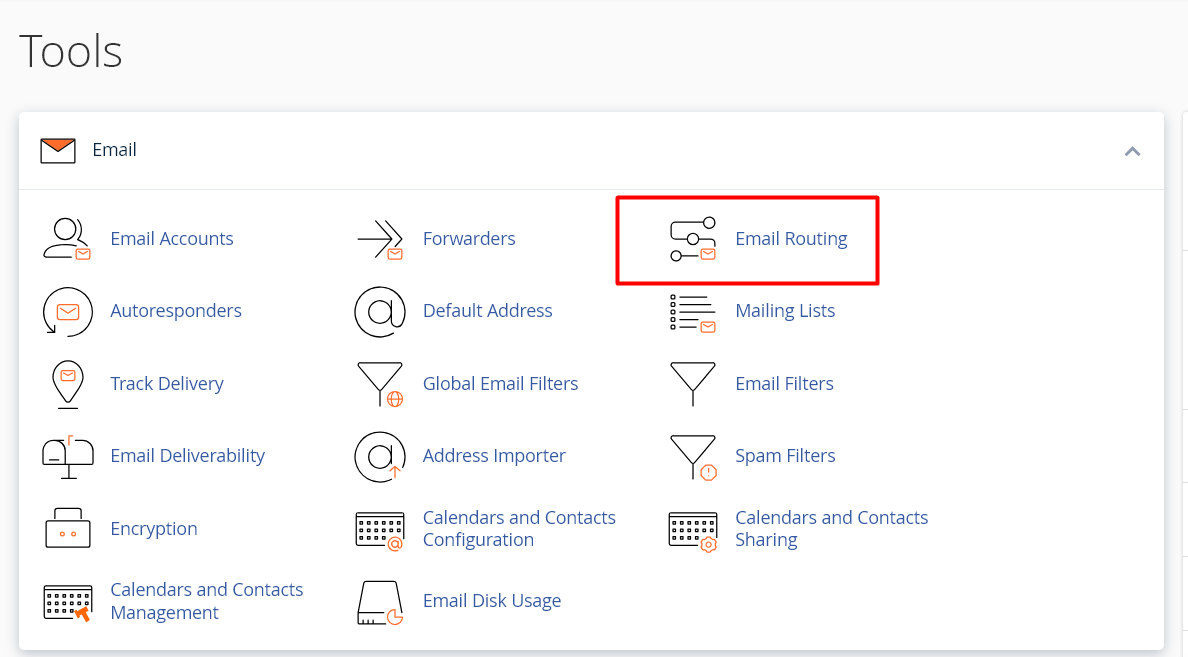
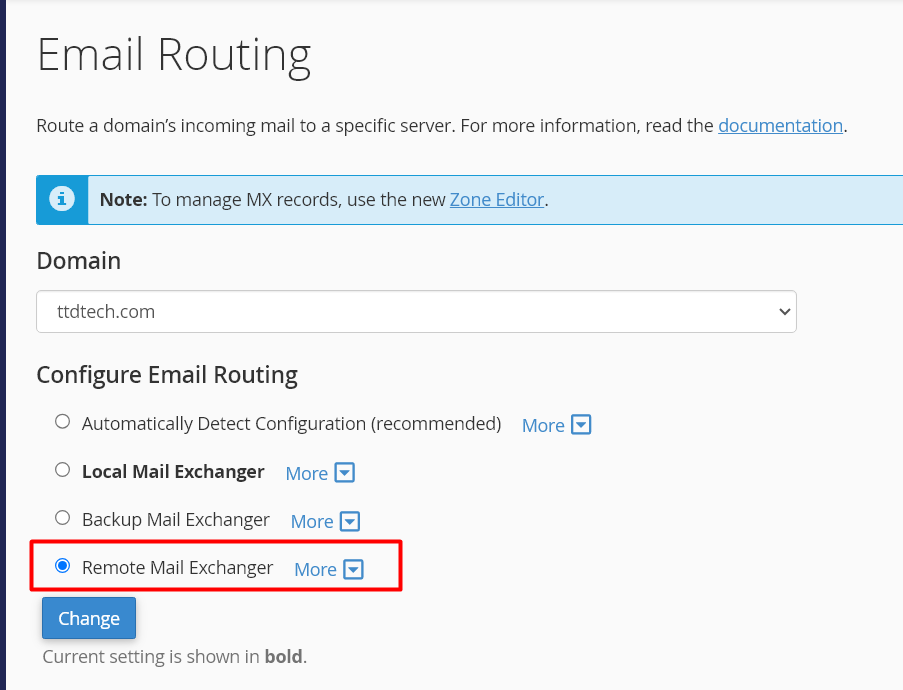
To make sure the mails direct remotely instead of local mail exchanger, you should update the email routing to remote. Login to cPanel and click “Email Routing”.

Now select “

After these changes, you need to wait for the DNS propagation which will take maximum of 24 to 48 hours so you can able to send and receive emails without having any issues.
Reference Article:
1. How to Setup SeekaHost Mail Records for your Domain
2. How to Setup DKIM Records for SeekaHost Email in Domain
3. How to Set up Custom Email Domain
4. How to Buy a Business Email Address For Your Domain
5. How to Set up Email Records in Cloudflare SeekaHost Mail
Hope this information helps you and enjoy this business email hosting to reach more clients.

