How to Limit Heartbeat API in WordPress?

By Menaga Devi
Table of Contents

One of the best features present in WordPress is the HeartBeat API. This HeartBeat API manages the frequency of the WordPress heartbeat API in a few clicks. Also, it provides real-time communication between the server and the browser. Although it has advantages, it also has some drawbacks. Sometimes, it can increase your CPU usage and can make your website to load slowly. In order to avoid these kinds of situations, we have to limit the Heartbeat API in WordPress. In this article, we have guided you on how to limit the Heartbeat API in WordPress.
The HeartBeat API makes the connection between the server and the browser using AJAX. Though it has many features, it may slow down the server.
Below are the steps mentioned to Limit Heartbeat API
How to Limit/Disable Heartbeat API in WordPress Without Plugin?
STEP 1: Installing the Plugin
At first, install and activate the Heartbeat Control plugin.
STEP 2: Heartbeat Plugin
Then, click on ‘Settings’ -> ‘Heartbeat Plugin’ to configure.
STEP 3: Control HeartBeat Locations
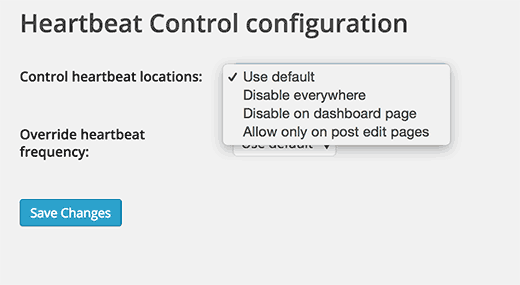
Tap on the ‘Control HeartBeat Locations’ option to set the control heartbeat settings. Also, you have an option to disable/enable in WordPress Plugin.
As you see the option, it explains by itself.
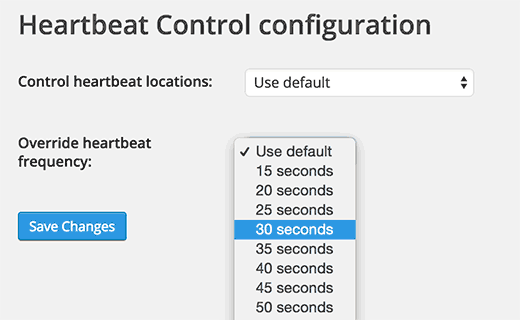
STEP 4: Overrate Frequency
The default overrate frequency is set at 15s. Tap on the option and select the time period you need. After that, click on ‘Save Changes’.

Now you have successfully limited the Heatbeat API using a plugin.
How to Disable Heartbeat API in WordPress Without Plugin?
You can use the below code into your theme’s functions.php file. If you’re the only user and sure about no need of the features by the API, you can disable it.
add_action( ‘init’, ‘stop_heartbeat’, 1 );function stop_heartbeat() {wp_deregister_script(‘heartbeat’);}
[Tweet “How to Limit Heartbeat API in WordPress?”]

