

How to Set Up Google Workspace with SeekaHost Domain

Table of Contents
Creating a profession business email with a custom domain is essential for business communication through with client or customers. To make this more professional and get more benefits out of the purchase that boost the business, then it is always recommend to Set Up Google Workspace with Custom Domain.
With Google Workspace, you get access to more powerful tools of GSuite along with the email to enhance the professional brand image for your business and setup custom email for your domain.
In this article, we will guide you through the process with simple step by step guidance to Set Up Google Workspace with Custom Domain in hosting and domain DNS.
About Google Workspace:
As a cloud based application, Google Workspace helps to increase productivity, communication and collaboration for an organization with your own domain name. Furthermore with Google Workspace, you will access essential tools like Gmail, Drive, Docs, Meet, and Chat. These tools in turn, will provide greater value and convenience for businesses that need efficient communication with clients.
Features:
- Communication
- Storage
- Content Creation
- Collaboration
- Whiteboarding
- Telephony

Set Up Google Workspace through Domain:
1. Set Up Google Workspace with TXT Record
Step 1: First, go to the Google Workspace Admin console.
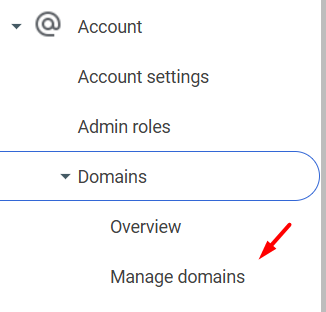
Step 2: Next, navigate to setting option and Click Account -> Domains > Manage Domain
Step 3: Then, click “Add a Domain” option.

Step 4: After that, enter the domain name, that you would like to add.
It’s important to note that the process remains the same if you have signed up for Google Workspace. Simply select the custom domain option and follow the remaining steps.

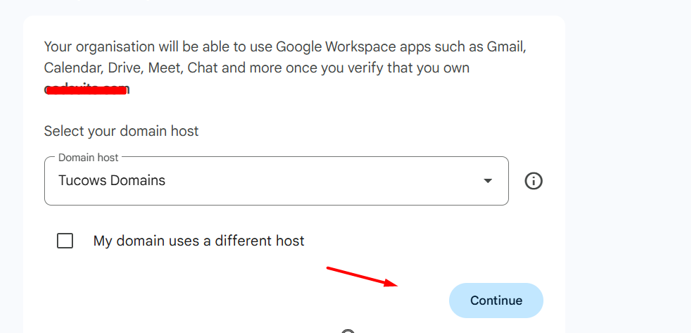
Step 5: Subsequently, choose the domain host as “Tucows Domains” (SeekaHost) from the drop down.
Step 6: Furthermore, in order to add the verification code in your domain, choose either TXT record or CNAME record option.
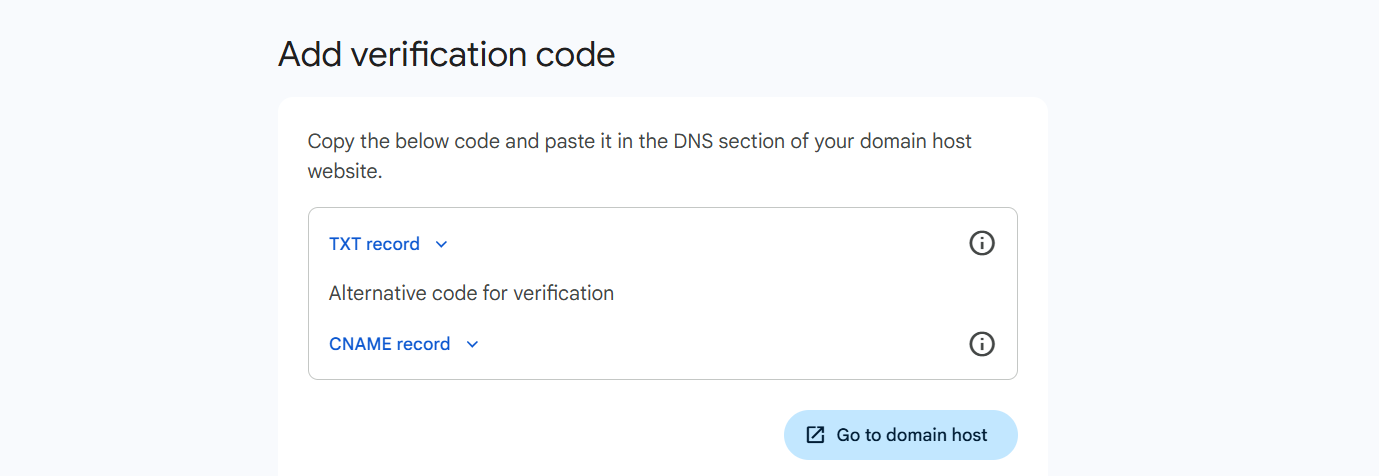
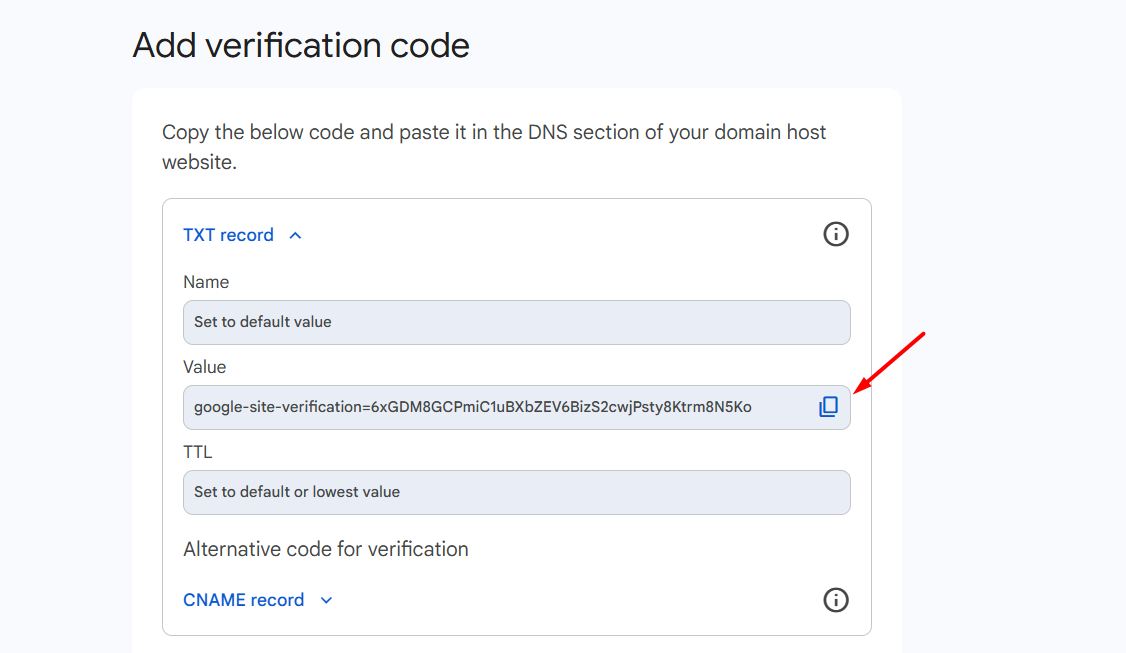
Step 7: In this case, we will go with TXT Record to update in domain. Click the Down arrow and Copy the values shown in the field.
Step 8: Following this, login to client area -> Domains section
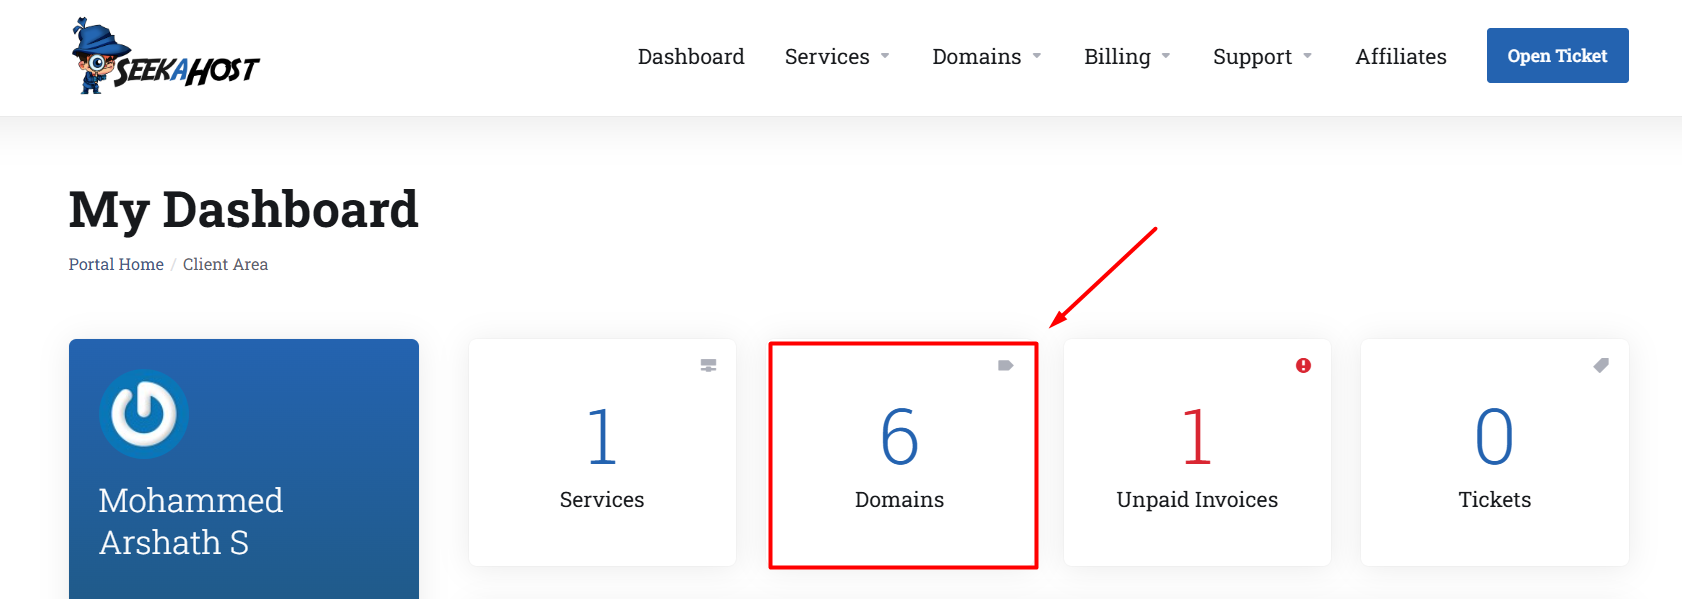
Step 9: Now, click ‘Manage’ button near the domain name.
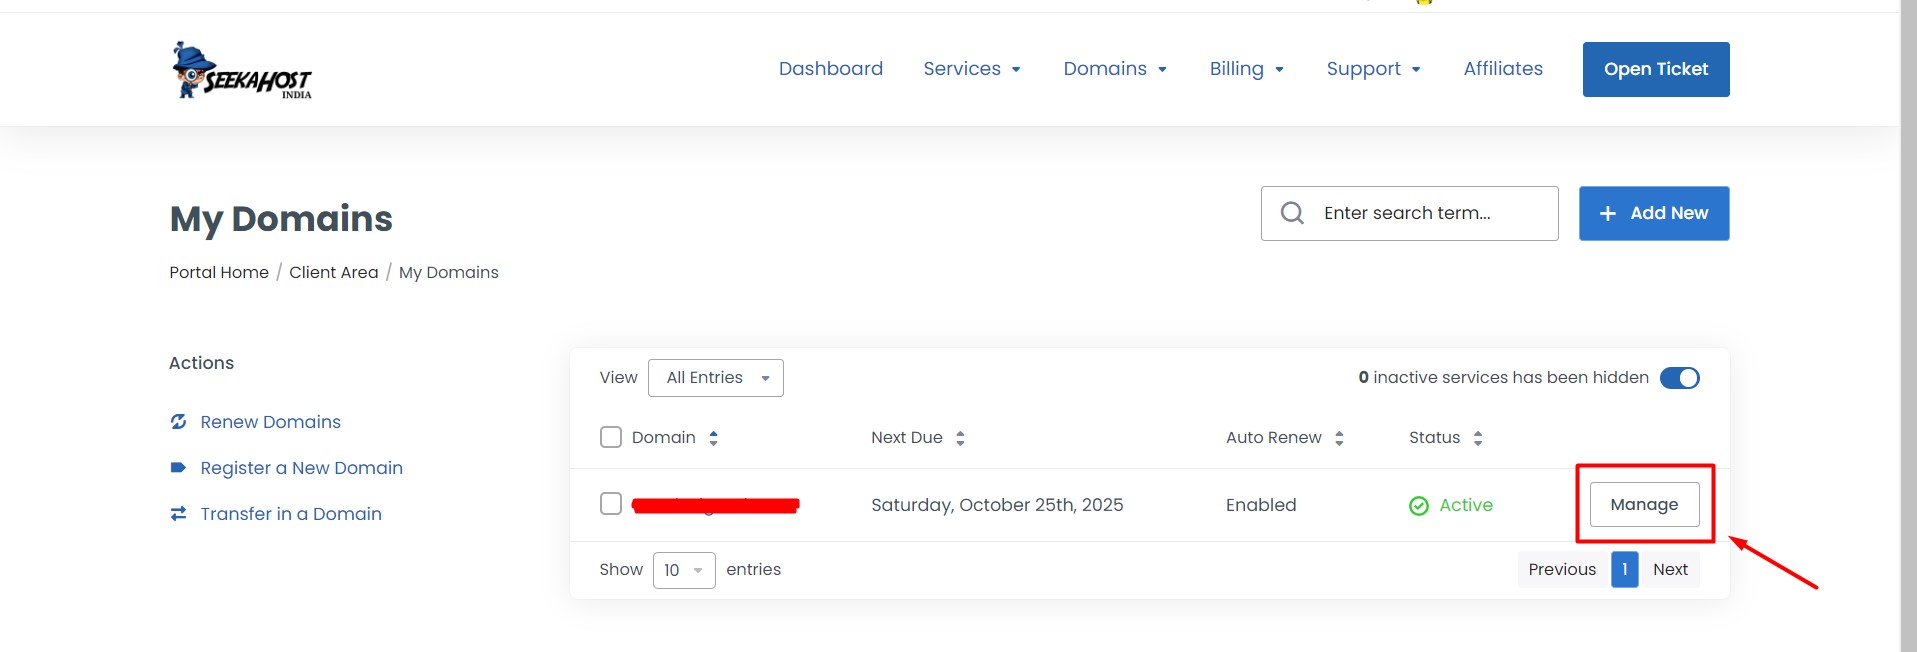
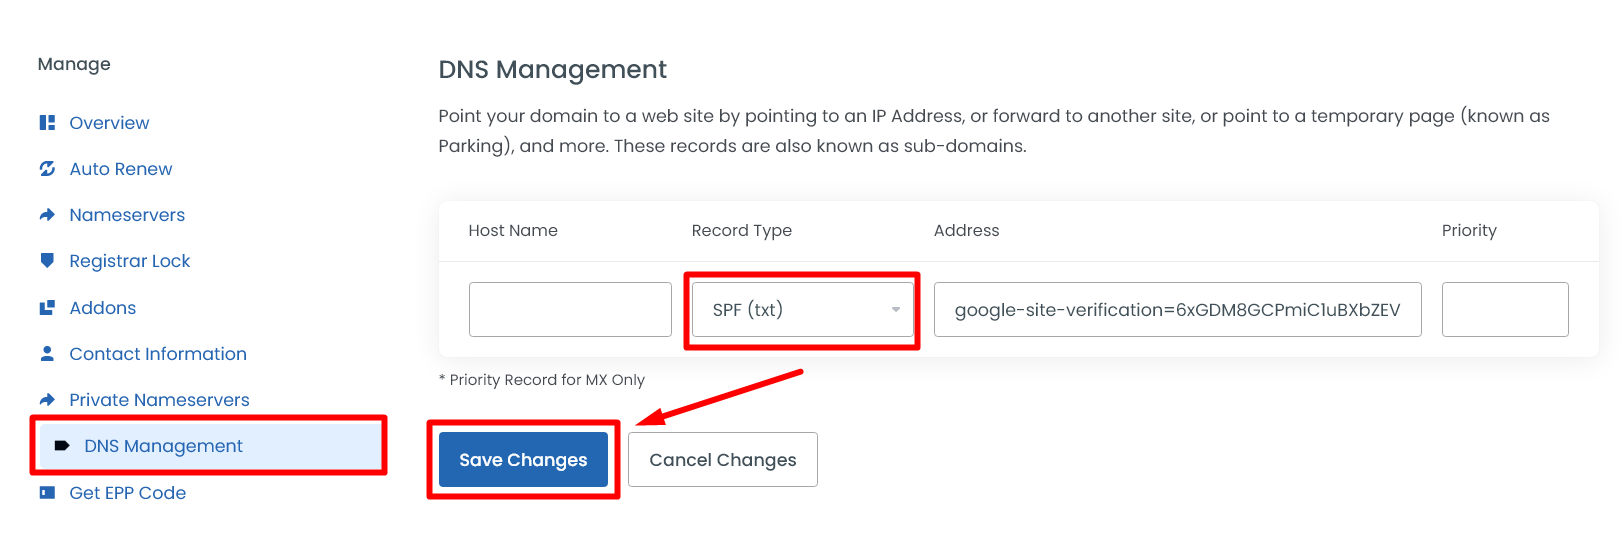
Step 10: Then, go to DNS Management option on the left side and select the type as “TXT” record and update the txt value copied in the step 7 above.
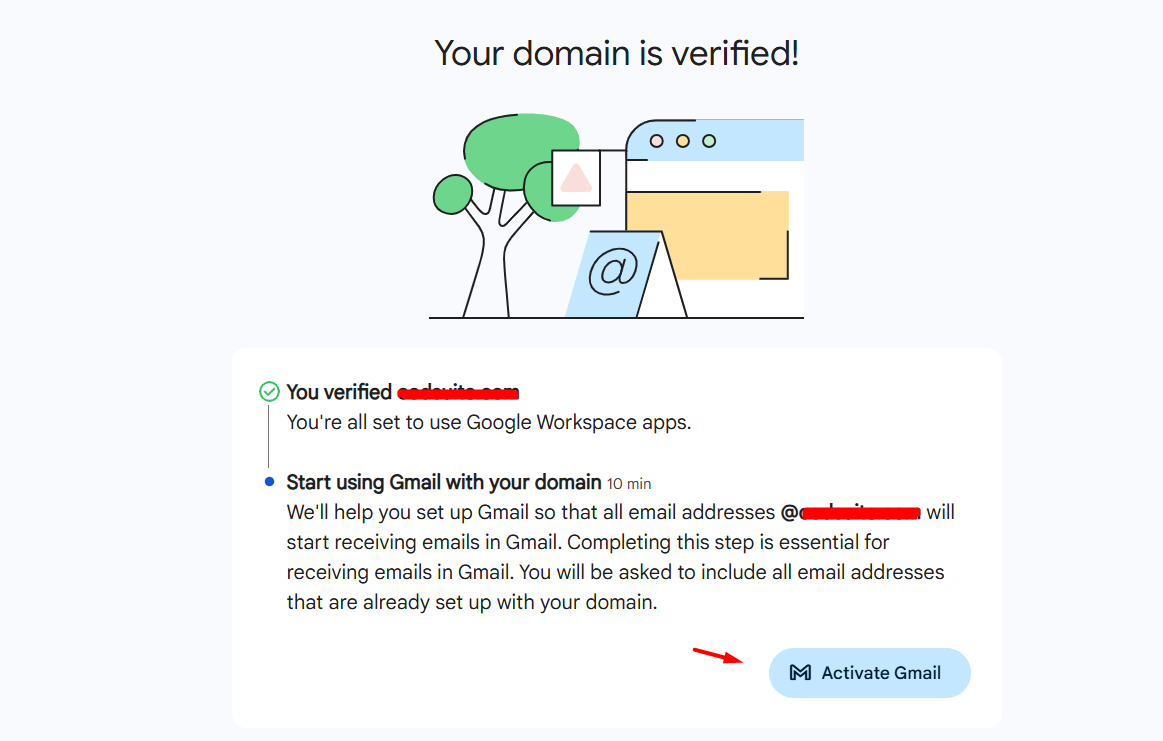
Step 11: Afterward, return to Google Workspace and click “Confirm” to verify the domain and TXT record. You can see the green status with verified message.
Step 12: To continue, click “Activate Gmail” button to proceed with Gmail setup.
Step 13: Finally, after adding the user, click “Proceed with Activation” button.

2. Set Up Google Workspace with MX Record
Step 1: Now, we need to add the Mx records provided by Google which you can find the same while configuring the domain in Google Workspace.
Use the MX record below to update your domain, regardless of the Google Workspace version you are using:
1. Legacy Version: (Before April 2023)
| Name/Host/Alias* | Priority | Value/Answer/Destination |
|---|---|---|
| Blank or @ | 1 | ASPMX.L.GOOGLE.COM |
| Blank or @ | 5 | ALT1.ASPMX.L.GOOGLE.COM |
| Blank or @ | 5 | ALT2.ASPMX.L.GOOGLE.COM |
| Blank or @ | 10 | ALT3.ASPMX.L.GOOGLE.COM |
| Blank or @ | 10 | ALT4.ASPMX.L.GOOGLE.COM |
However, if the mail service is not working, replace all previous MX records with the new one below. Google made this change to simplify the process with a single update.
2. Current Version: (After April 2023)
| Name/Host/Alias* | Priority | Value/Answer/Destination |
|---|---|---|
| Blank or @ | 1 | SMTP.GOOGLE.COM |
Step 2: Consequently, go to domain DNS management option -> select the record type as MX and paste the value. Here we will go with the MX record value of version after April 2023.
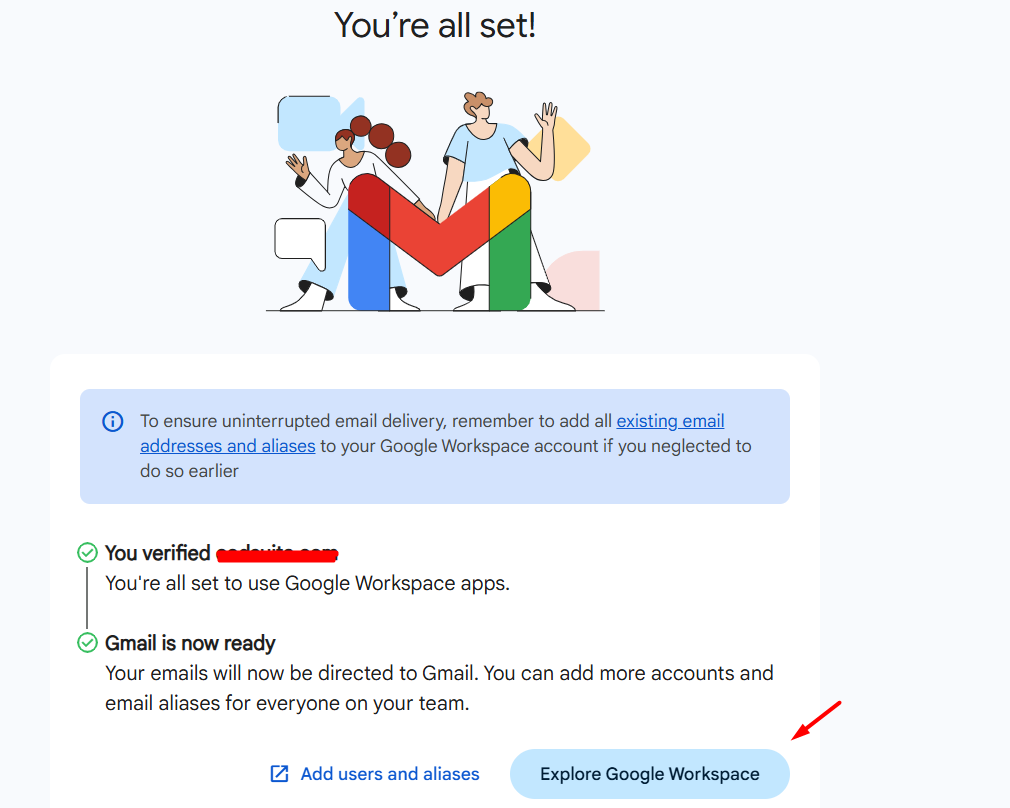
Step 3: Following this, go to the google workspace, then click ‘confirm’ to verify the mx record. Once this process is completed, you will see the ‘You’re all set’ message. Then, click “Explore Google Workspaces” button to check the interface.
3. Configure SPF and DKIM Record in Domain.
Step1: Firstly, go to the admin console page.
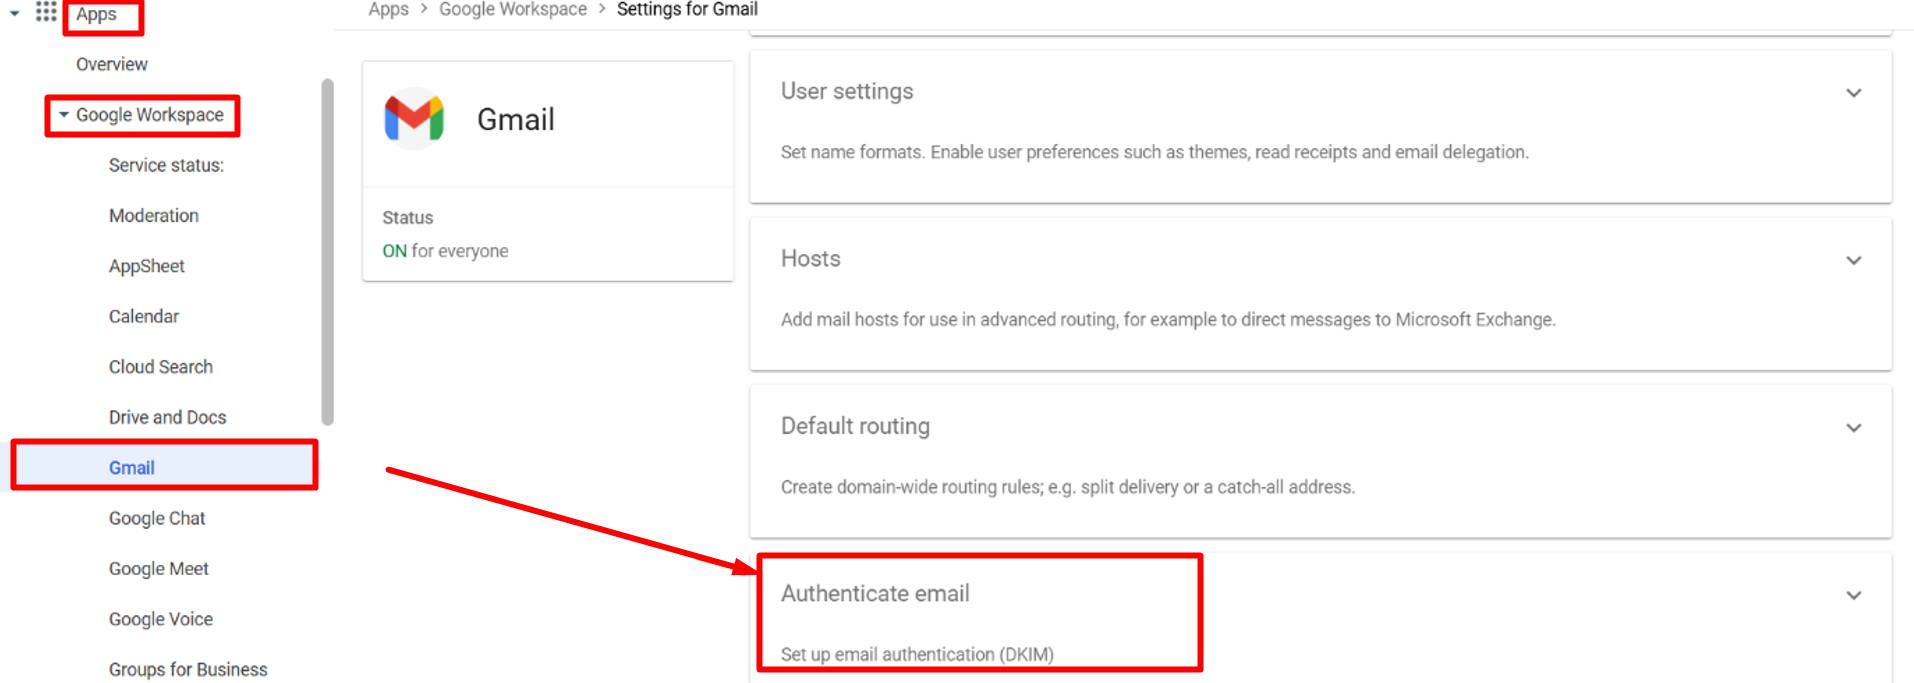
Step 2: Then, under “Apps” on your left side -> Google Workspace -> Gmail -> Select “Authenticate Email”
Step 3: Next, select your domain and click ‘Generate New Record’ button.
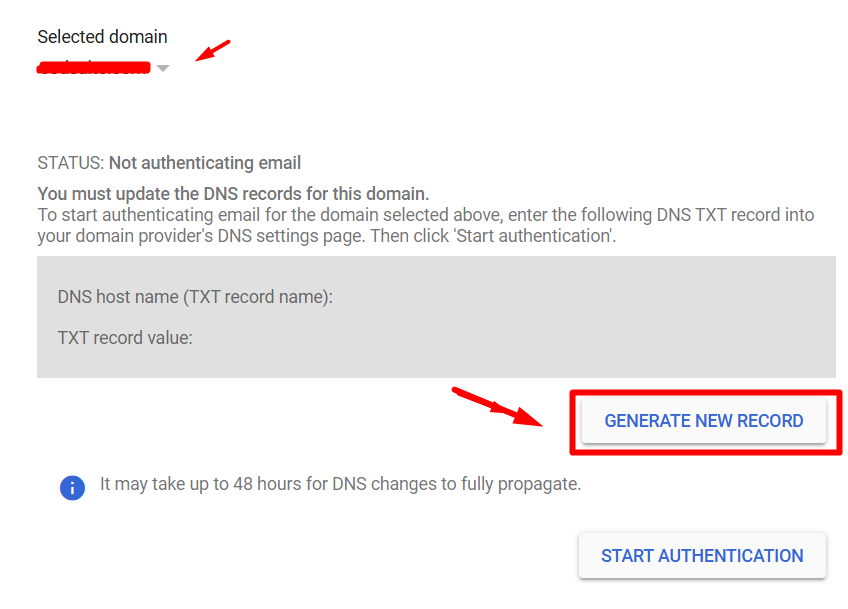
Step 4: After that, select ‘1024’ from the drop down for DKIM key bit length and click “Generate“.
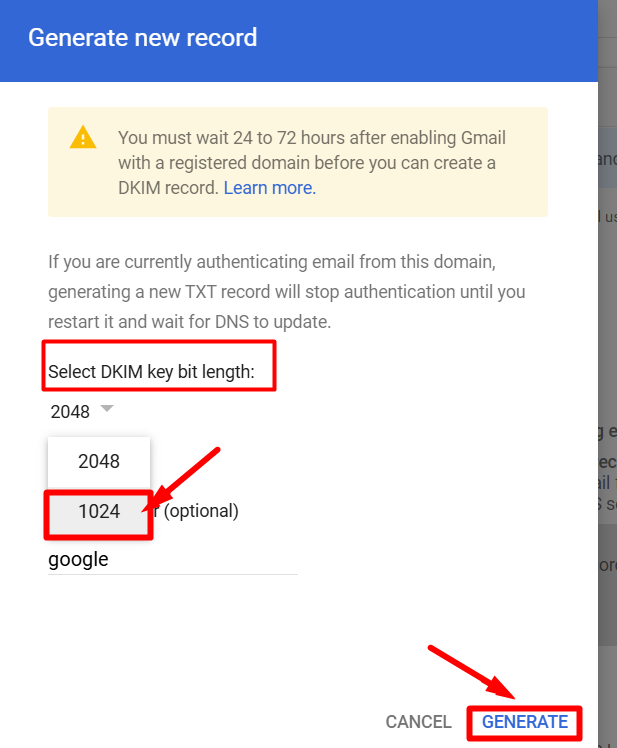
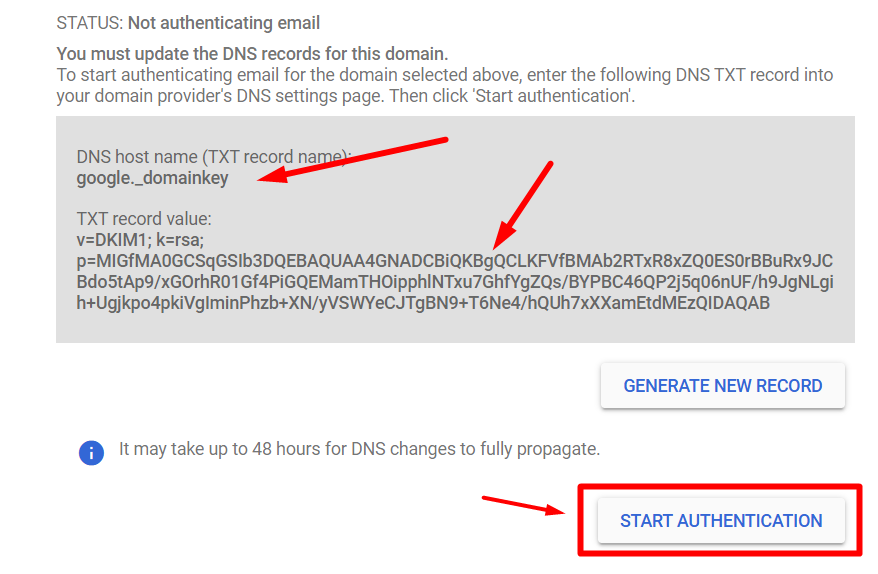
Step 5: Following this, once records are generated, copy the value of DNS Host name and TXT record value. Let’s update this record along with SPF record in domain DNS in step 6.
After updating both records, click “Start Authenticate” to validate the DKIM TXT Record in google workspace.
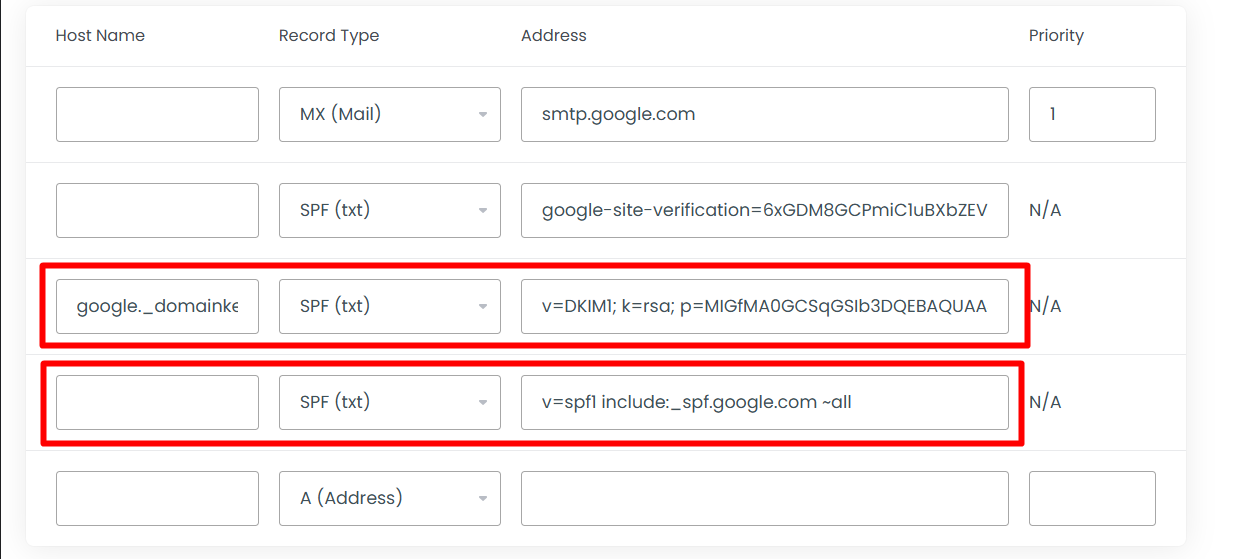
Step 6: Subsequently, go to Domain DNS management and select record type as “TXT” from where you updated the previous DNS records. Now update the above TXT (DKIM) record and as well below SPF (TXT) record in the domain DNS.
v=spf1 include:_spf.google.com ~all
With that, you have successfully updated the mail records in the domain.
Set Up Google Workspace through cPanel:
If your domain is using a hosting nameserver, you will need to update the Google Workspace DNS records in the cPanel DNS Zone Editor. This is because, DNS management and propagation will take place through the cPanel DNS Management since your domain relies on a hosting nameserver.
Importantly, the process to get the records from Google Workspace is the same; however you only need to update the records in cPanel DNS.
Step 1: To begin, login to the cPanel.
Step 2: Then, search zone editor in search bar and select it.

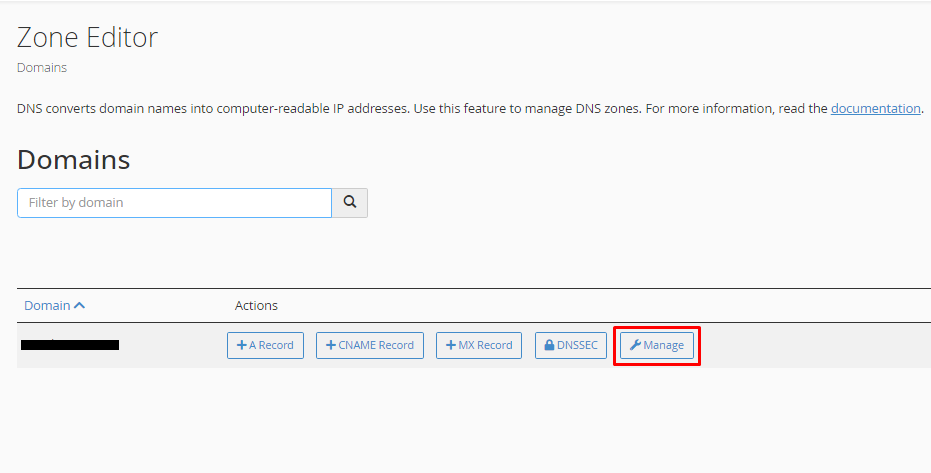
Step 3: After that, click on the “Manage” button next to the domain where you want to add to the mail records.
Step 4: Next, Click the Down arrow button next to Add Records and click “Add TXT Record” option.

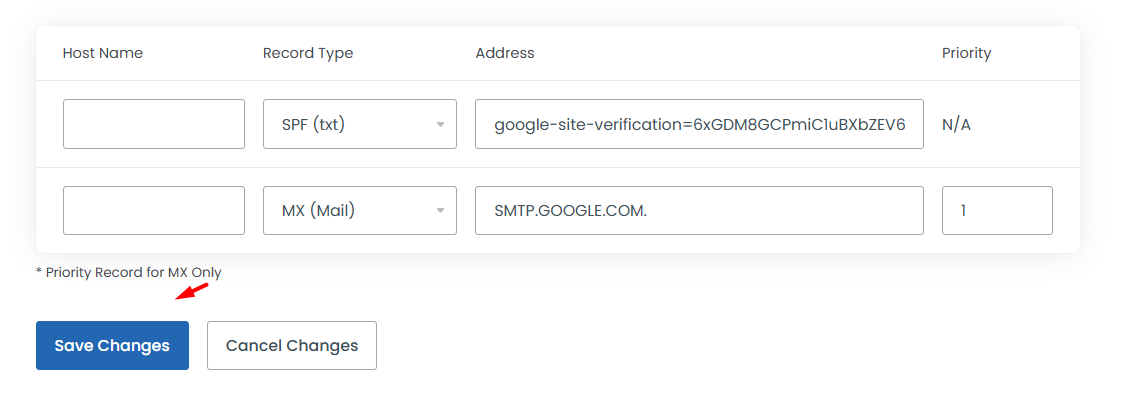
Step 5: Now, update the TXT record values as follow and Click “Save Record”.
- Name: Enter the domain name
- Record field: Paste the TXT Value

Step 6: Moving on, you need to delete the old MX records and update the new MX record. Click the ‘Down arrow’ option next to ‘Add Records‘ and click ‘Add “Mx” record’.
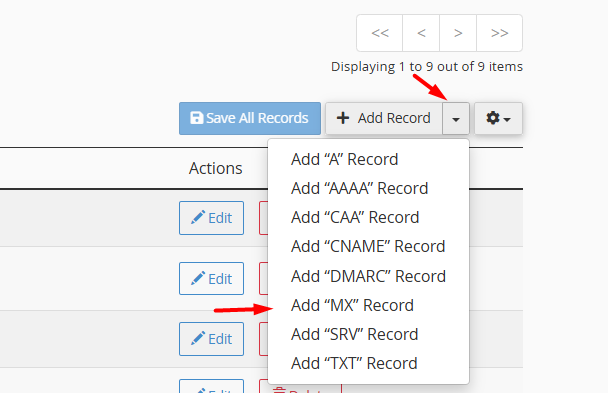
Update the mx record values as follow,
- Name: Enter the domain name
- Record field (Priority): Update value as 1.
- Record field (Destination): smtp.google.com

Step 7: Next, Choose the option Add “TXT” record’ by following the above step and Update the TXT record for DKIM values as follow,
- Name: google._domainkey
- Record field: Paste the TXT DKIM Value

Step 8: Lastly, choose the option Add “TXT” record’ and Update the TXT record for SPF values as follow,
- Name: Enter the domain name
- Record field: v=spf1 include:_spf.google.com ~all

Configure Email Routing for Mail
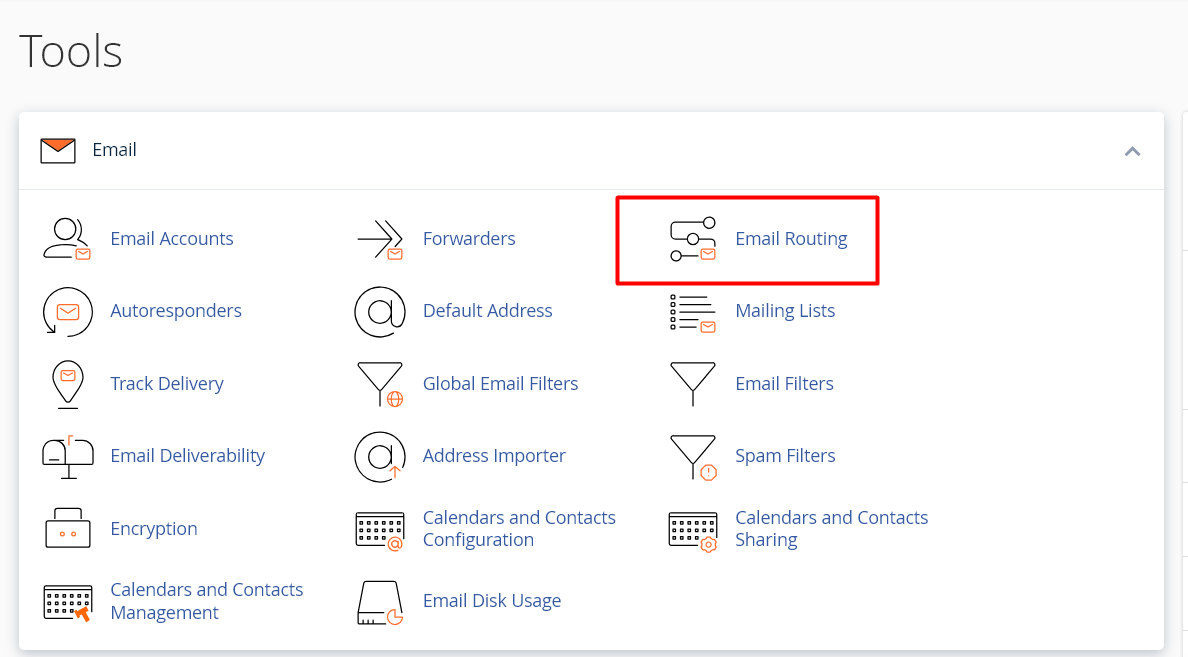
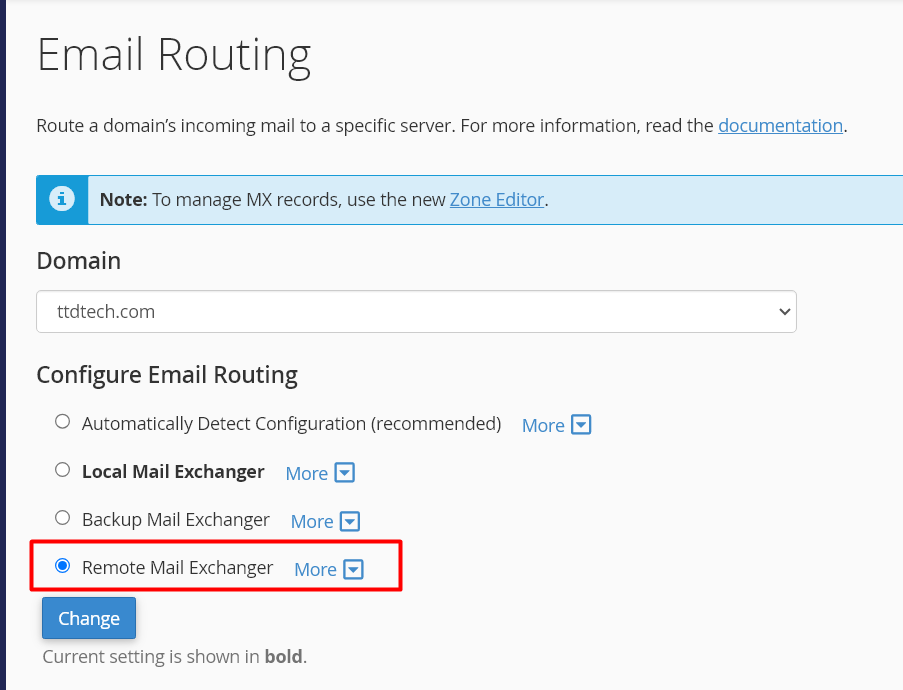
To make sure the emails direct remotely instead of through local mail exchanger, you should update the email routing to remote. Login to cPanel and click “Email Routing”.
Now, select “
Finally, after making these changes, you need to wait for the DNS propagation which will take maximum of 24 to 48 hours, so you can able to send and receive emails without having any issues.
Hope this article guide you through the process of Set Up Google Workspace with domain DNS and cPanel DNS.