Tag: cpanel

Online Marketing Tips Types Of Hosting Find Expired Domains Expired Domains Guide Invest In Domains .Tech Domain Names

What Is Webalizer In cPanel and How to Use it?

Use of Webalizer In cPanel

Use of Webalizer In cPanel


Webalizer is used to view the stats of the website traffic and it’s visitors, who are visiting your websites. It produces the stats on different varieties which can be easily identified by the users. The stat information is displayed in the form of graphs, charts, etc., Also, you can analyse the bandwidth usage by viewing the visitor’s information.

The Webalizer gives you the information based on visits, pages, files, hits, etc.,

In this article, we will guide you  how to view the statistical information of your site.


Process for Webalizer In cPanel

STEP 1: Login

Log in to the cPanel account of your website.


STEP 2: Webalizer

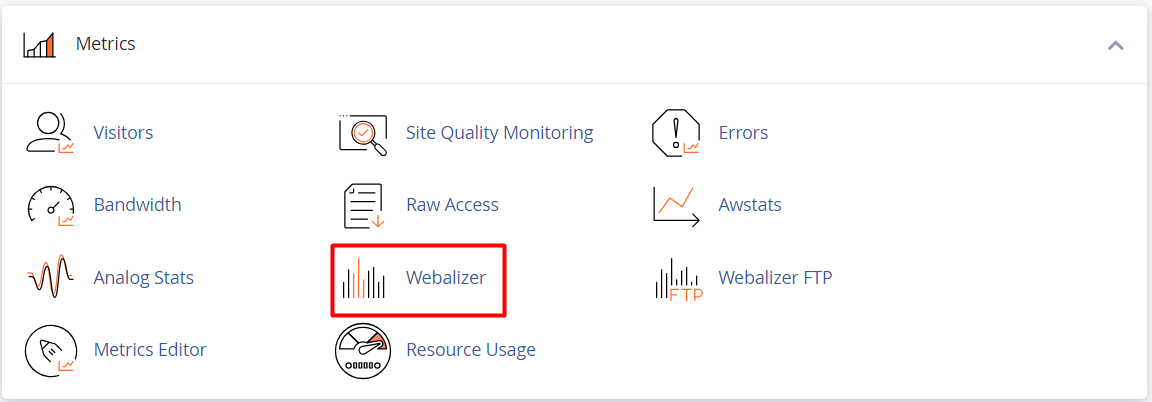
Click on the ‘Webalizer’ option which is available under the ‘Metrics’ section.

Webalizer Bandwidth Analysis


STEP 3: Viewing Statistics

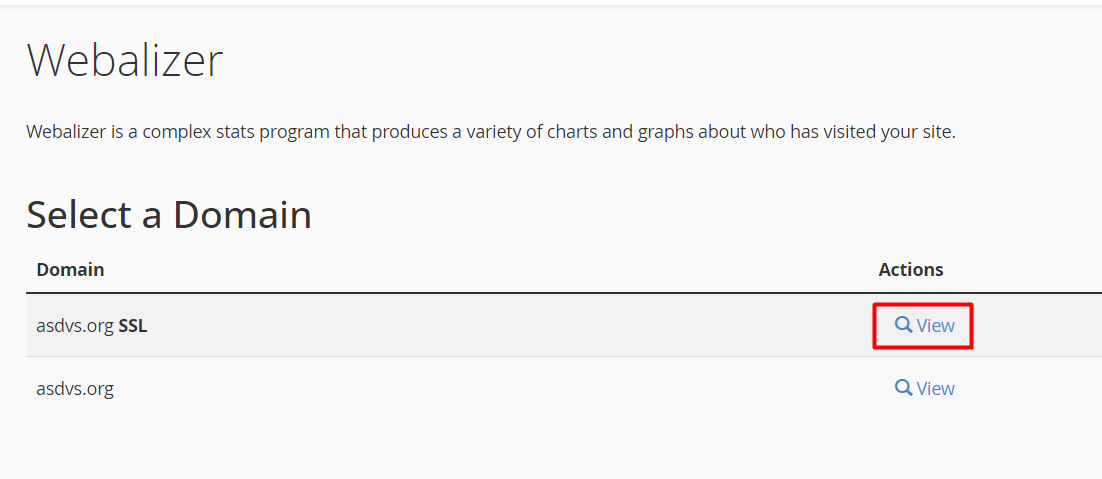
You will have two option in this page – SSL and Non-SSL. In order to analyse bandwidth or website traffic, you need to check both. But you should try to update all of your website files which has http in the code to https and make sure the website is installed and loading with SSL.

Here, click ‘View‘ on the line which has ‘SSL’ near the website name.

Click View o Display Stats


STEP 4: Detailed Statistic Reports

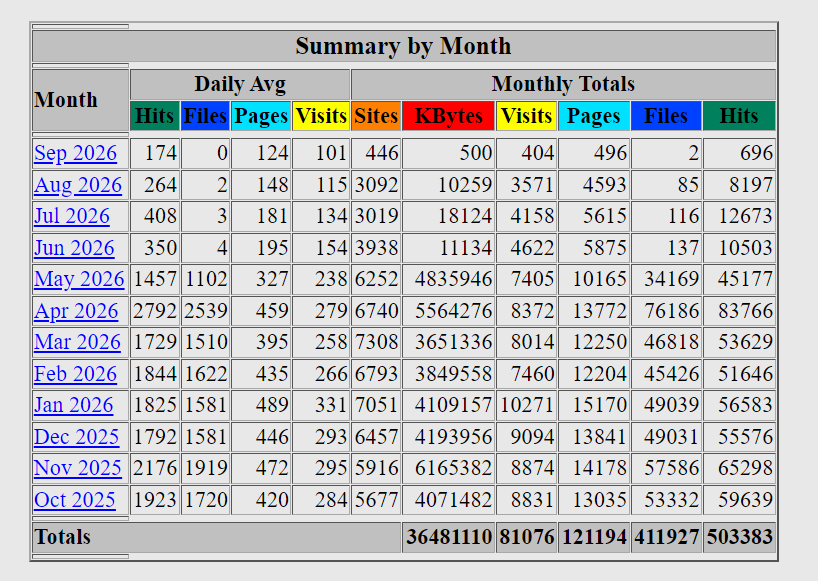
You can see the overall statistical reports summary of the website with bytes and number of visitors.

Click on any month to see the complete statistical reports of the website, which will be displayed depending on that month visitors.

Statisticial reports of the visitors


Useful Resources:

What is Bandwidth in Web Hosting

Difference In Server Bandwidth and Network Bandwidth


[Tweet “What Is Webalizer In cPanel?”]

If you are a registered user in SeekaHost and have any queries to be clarified or issues to be sorted, you can raise a ticket through client area dashboard or email to support@seekahost.com. For immediate interaction or guidelines, contact our support team available in LiveChat at the right bottom corner of the website.

How to do Hotlink Protection in cPanel?

Hotlink Protection in cPanel

Hotlink Protection in cPanel


Hotlink Protection is the simplest way to protect your sites from the other sites. In other words, it helps you to prevent the linking of sites directly to the images and other files on your website.

For example, If I have owned a site and the stranger likes the image and description, then used the URL of the image in their site. When some visitors visit the stranger’s site, the image on my site gets downloaded every time. Thus, there is a huge loss of bandwidth on my site. This is called Hotlink.

To safeguard your site and also to reduce the usage of bandwidth, cPanel provides a tool called ‘Hotlink Protection’.

In this article, we have guided you on how to use the hotlink protection in cPanel.

Enabling Hotlink Protection in cPanel

STEP 1: Login

Login to cPanel of your website.


STEP 2: Hotlink Protection

Navigate to the ‘Security’ section, and click on ‘Hotlink Protection’ under the security section.

Hotlink Protection


STEP 3: Enabling protection

Click ‘Enable’. Now, you have enabled the Hotlink protection for your site.


STEP 4: Allowing URL to access

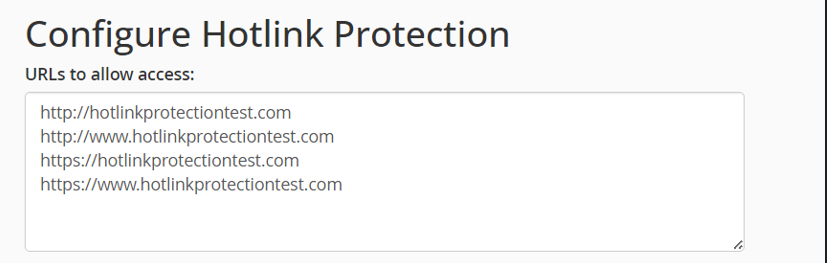
Under ‘URL’s allow to access domain’. Enter the list of URL’s that can access your site.


URL to Allow Access


STEP 5:  File Extensions

In the ‘Block Direct Access’ box, enter the list of file extensions that you wanted to block direct access.

Block Direct Access - Hotlink


STEP 6: Direct Requests

After entering the file extensions, click on the checkbox ‘Allow Direct Requests’.

Allow Direct Request - Hotlink


STEP 7: Redirecting request

Another feature in hotlink protection is, you can also Redirect request to any specific URL entering in the text box. When user try to access embedded file in another website, it will be redirect to this URL Now Click on ‘Submit’.

Redirect the Request to URL- Hotlink


Now, you have successfully enabled the Hotlink Protection. Now, let us see how to disable hotlink protection.

Configure Hotlink Protection


How to Disable Hotlink Protection

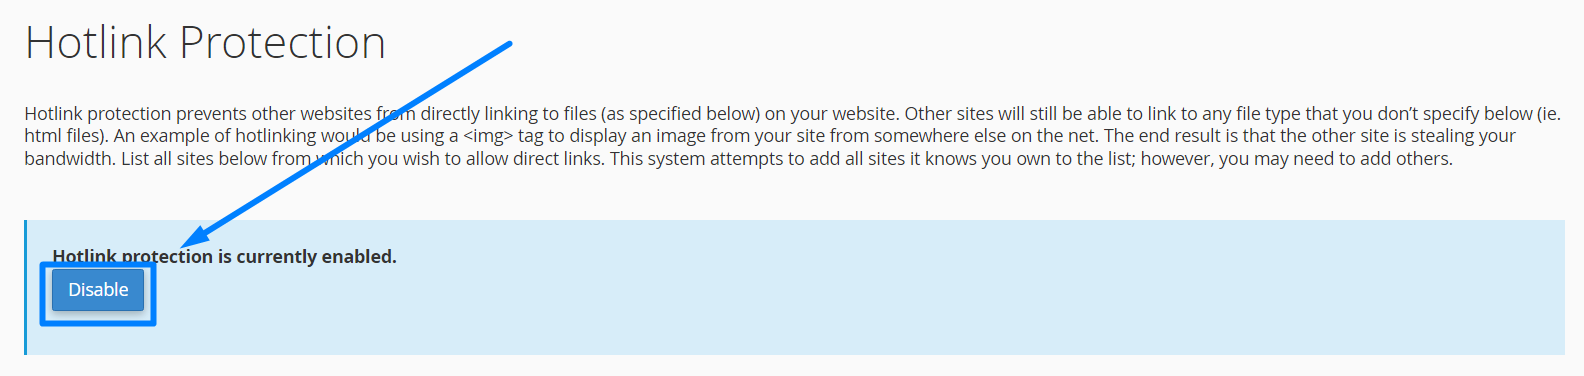
Step 1: Under the security section of cPanel, click on Hotlink Protection.

Step 2: Click ‘Disable’.

Disable Hotlink Protection


Hope the information in the article helps you protect your files from being used in any of other websites.


[Tweet “Hotlink Protection in cPanel”]

If you are a registered user in SeekaHost and have any queries to be clarified or issues to be sorted, you can raise a ticket through client area dashboard or email to support@seekahost.com. For immediate interaction or guidelines, contact our support team available in LiveChat at the right bottom corner of the website.
How To Create A Website Via cPanel’s Site Publisher?

Site Publisher in cPanel

Site Publisher in cPanel


Site Publisher is one of the most useful tools for many of the users, which enables you to quickly create a simple website even if you have never created before. This ‘Site Publisher’ tool provides templates to choose from and then simply add the appropriate information to it.  In this article, we will guide you on how to create a site using Site Publisher.


STEP 1: Login

Login to your cPanel account.


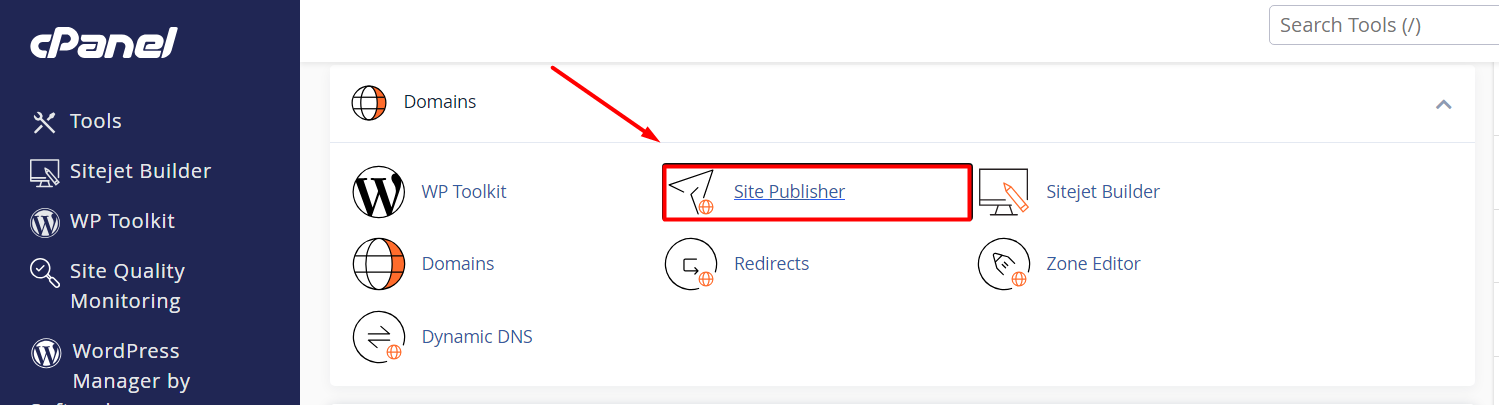
STEP 2:  Site Publisher Tool

The Site Publisher tool is available under the ‘Domains’ section.

Site Publisher cPanel


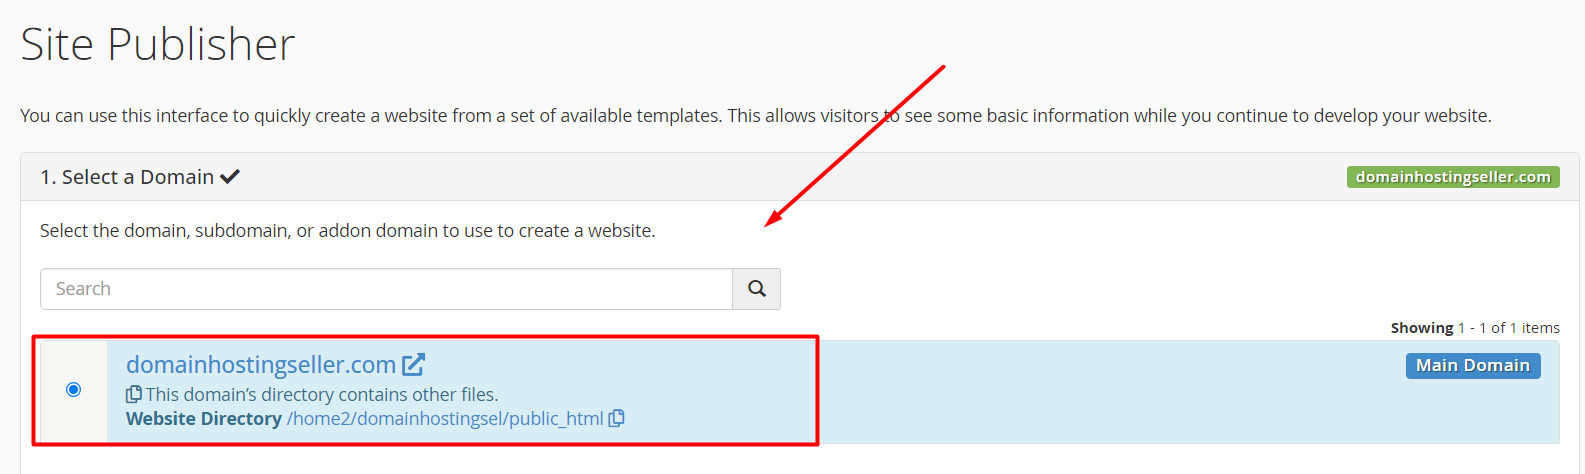
STEP 3: Choosing the domain

After clicking the tool, you have to choose the domain the publisher should use.

Choose Domain in Site Publisher


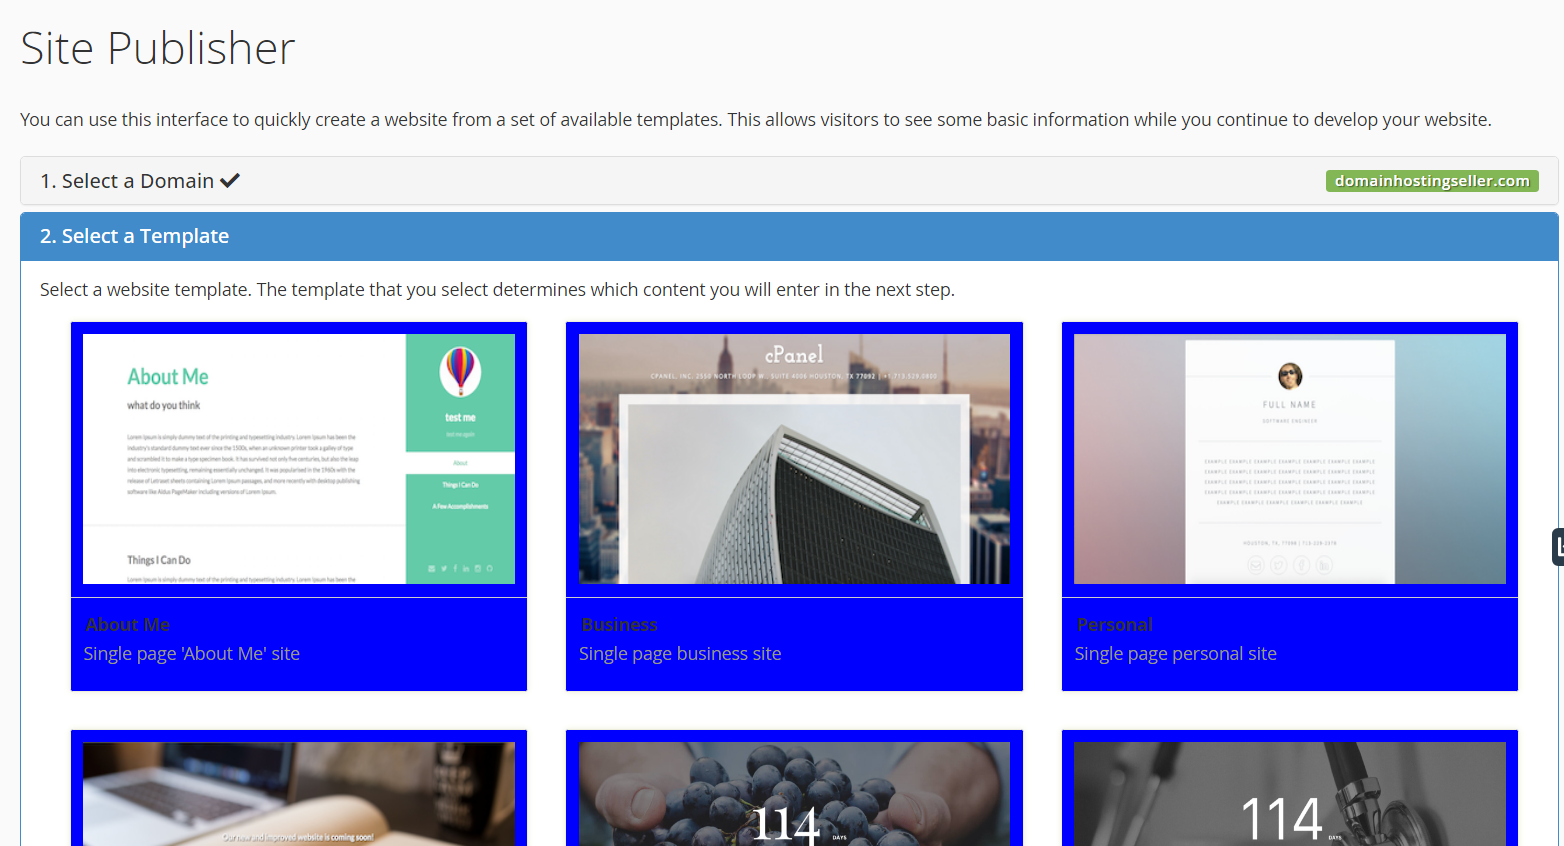
STEP 4: Templates

Once selected, it will show you the list of templates that you can choose.

Select a Template - Site Publisher


STEP 5: Publishing

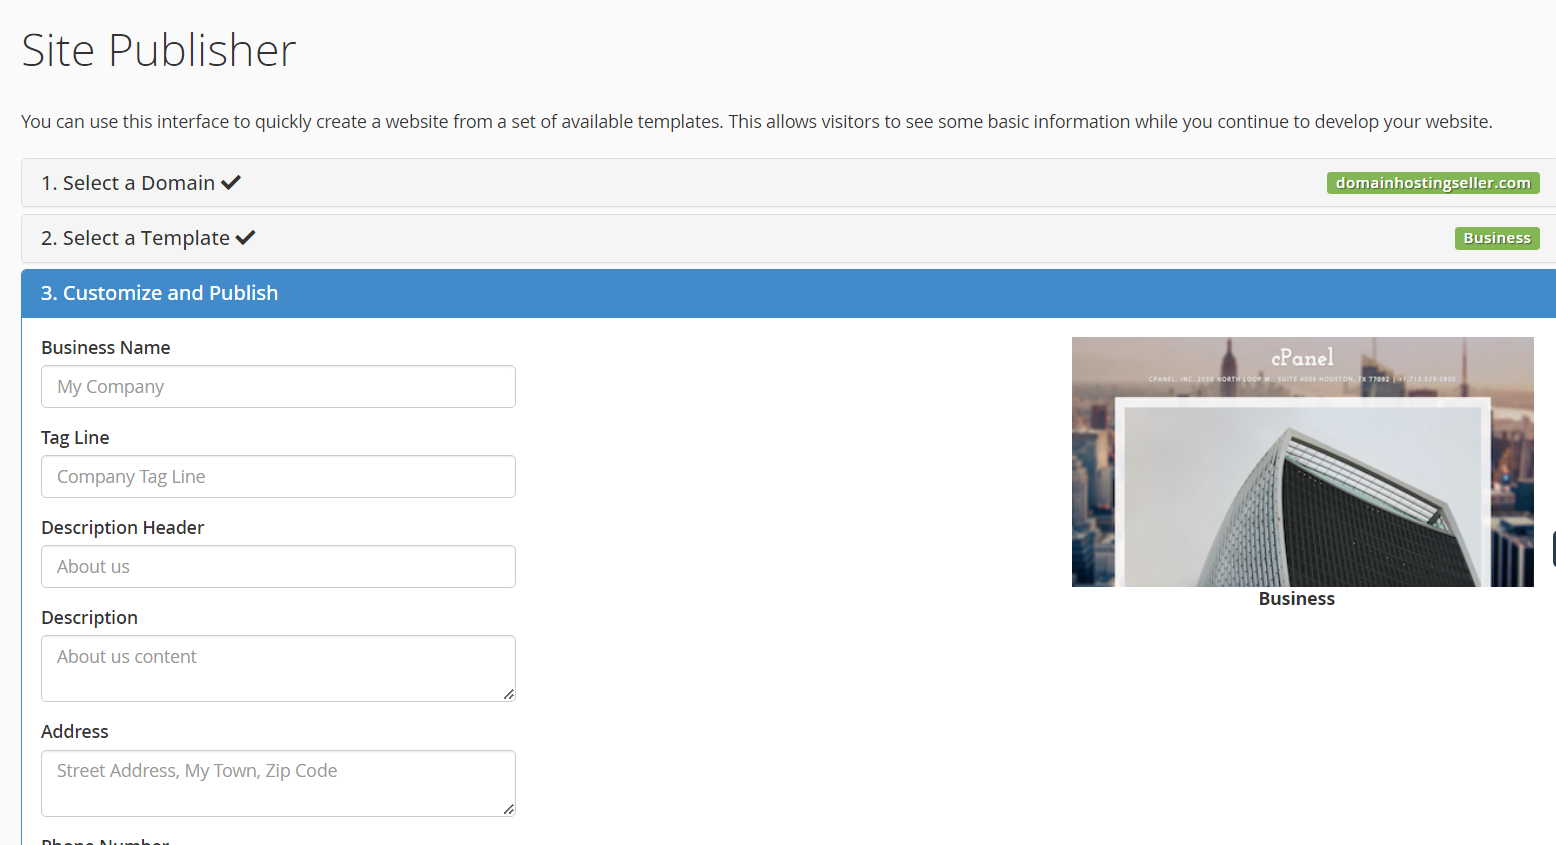
After choosing a particular template, you have to fill some details such as Title, Description, etc., After all, click on ‘Publish’.

Customize the Template and Publish


Now you’ve successfully created a temporary website to inform your visitors about what you wish.


[Tweet “How To Create A Website Via cPanel’s Site Publisher”]

If you are a registered user in SeekaHost and have any queries to be clarified or issues to be sorted, you can raise a ticket through client area dashboard or email to support@seekahost.com. For immediate interaction or guidelines, contact our support team available in LiveChat at the right bottom corner of the website.
What Is phpMyAdmin In cPanel?

PHPMyAdmin in cPanel

PHPMyAdmin in cPanel


What is phpMyAdmin?

phpMyAdmin is a third-party tool in cPanel which is generally used to manage tables and data inside a database.  It acts as an interface to manage MySQL databases. phpMyAdmin is a raw view of the data, tables, and fields which are stored in MySQL database accessible through it.


What is phpMyAdmin good for?

It is a user-friendly program for performing maintenance operations on tables, backing up information and also can edit things directly in the event that WordPress is not working. Many of the tasks can be performed on the MySQL command line, doing so is not an option for many people.


Features of  phpMyAdmin:

It has a user-friendly web interface

Supports most of the MySQL features. Such as

  • Browse and drop databases, tables, views, fields, and indexes.
  • Create, crop, drop, rename and alter databases, tables, fields, and indexes
  • Manage MySQL user accounts and their privileges.

And more on.


How to get and access phpmyadmin?

Most of the hosting companies providing control panels such as cPanel and Plesk has phpMyAdmin preinstalled.  It is usually linked to the database page. You can also download phpMyAdmin by yourself and install it from the main phpMyAdmin.

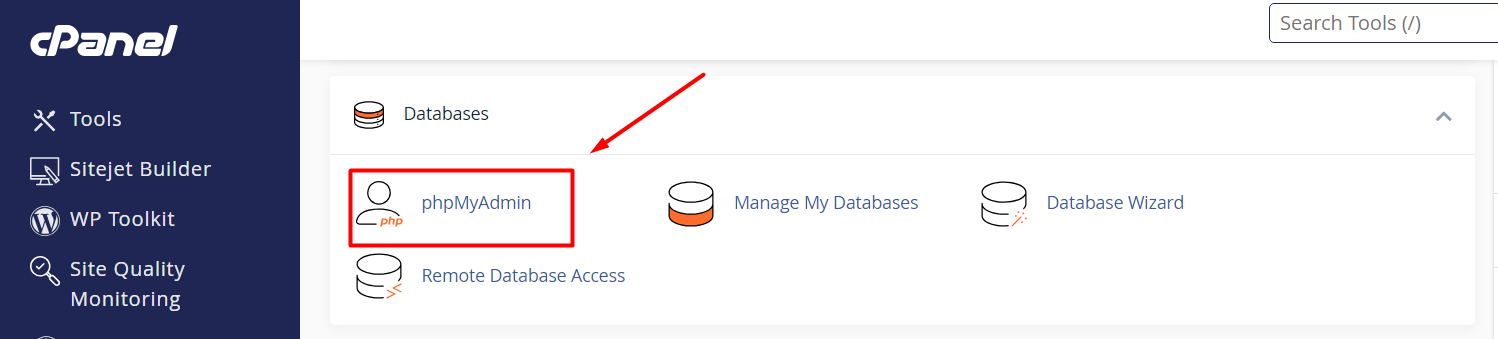
To access it, click on the phpMyAdmin link which is available under the section Databases.

phpMyAdmin - cPanel


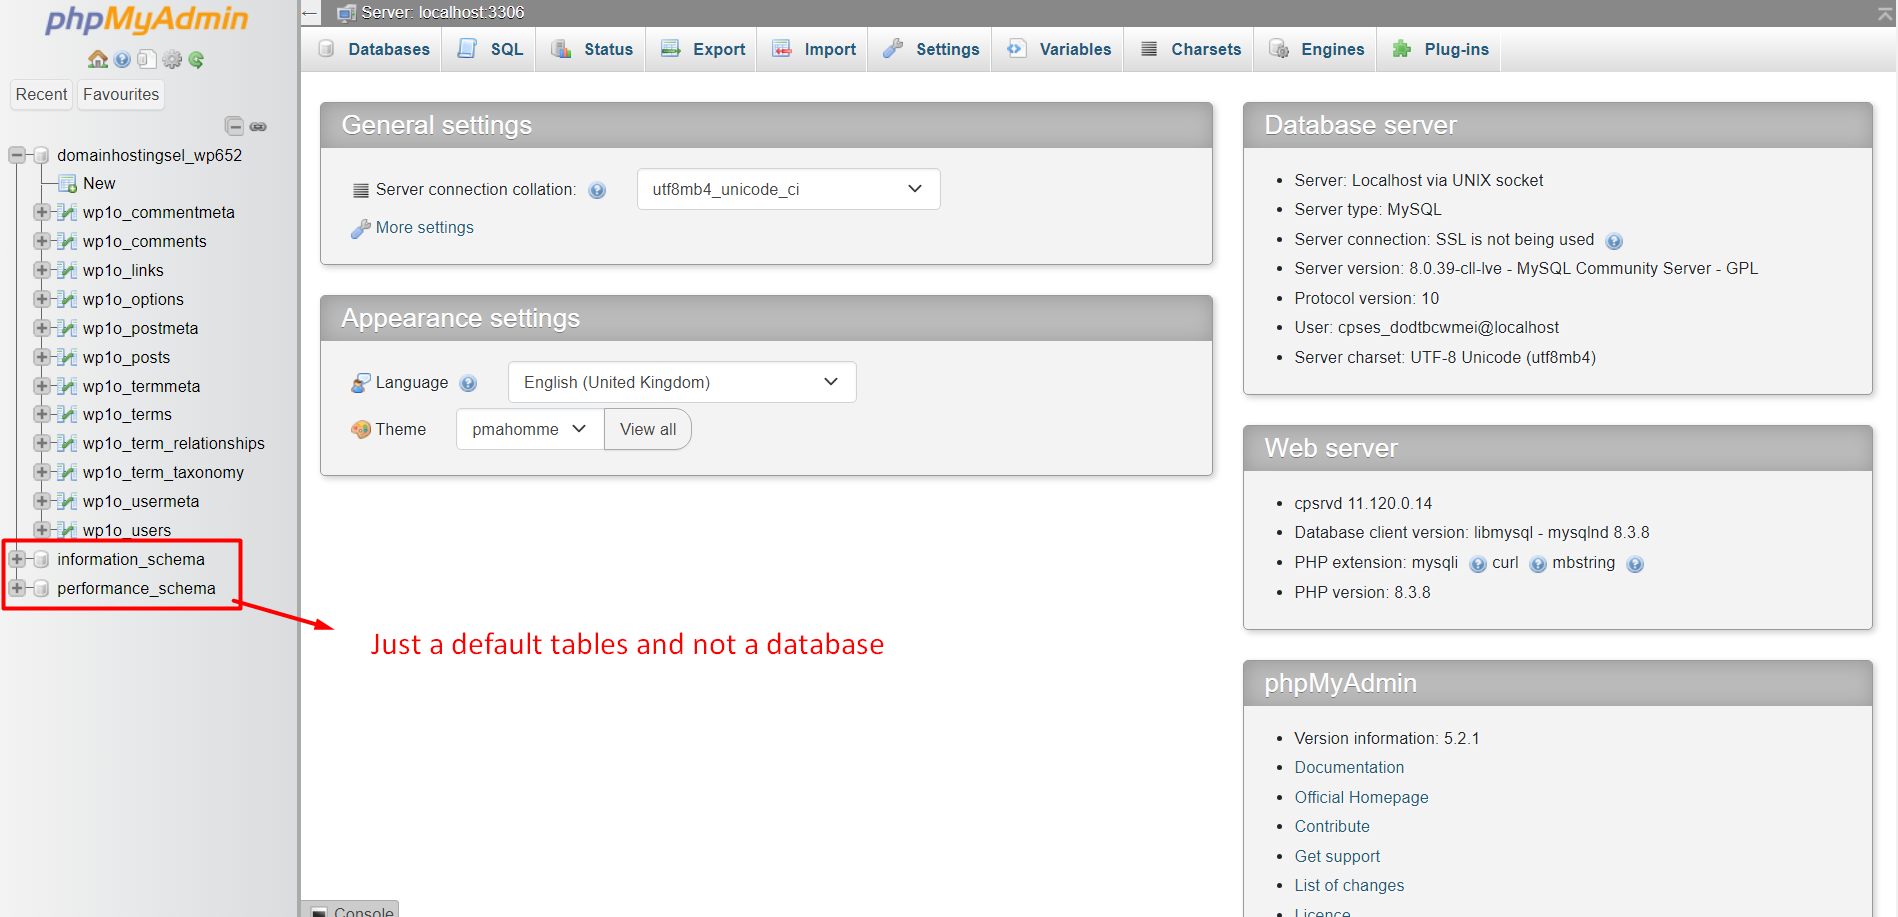
There you can see the dashboard page of the phpMyAdmin.

On the left-hand side,  you can see the list of databases by expanding it to see the table in each database.  On the right side, it displays the general information of the Database server.

phpMyAdmin database information - cPanel


phpMyAdmin allows the user to interact with the database directly. At times, it makes you mess with the database directly. The major thing is, the options such as ‘Undo’ or ‘Undelete’ are not present in your database. So, we suggest you to be cautious when working with the database.


[Tweet “What Is phpMyAdmin in cPanel?”]

If you are a registered user in SeekaHost and have any queries to be clarified or issues to be sorted, you can raise a ticket through client area dashboard or email to support@seekahost.com. For immediate interaction or guidelines, contact our support team available in LiveChat at the right bottom corner of the website.

How to Optimize Website Using cPanel?

Optimize Website Using cPanel

Optimize Website Using cPanel


The “optimize website” feature in cPanel allows the user to make gzip compressions.  Gzip compressions are supported by most of the browsers. For gzip compressions the Apache mod_deflate is very much needed to function and it will be available in most of the Linux servers. It saves the bandwidth which is a big advantage for most of the users and enables the site to load faster. It can compress all types of files.


Enabling gzip compression:

STEP 1: Opening the interface

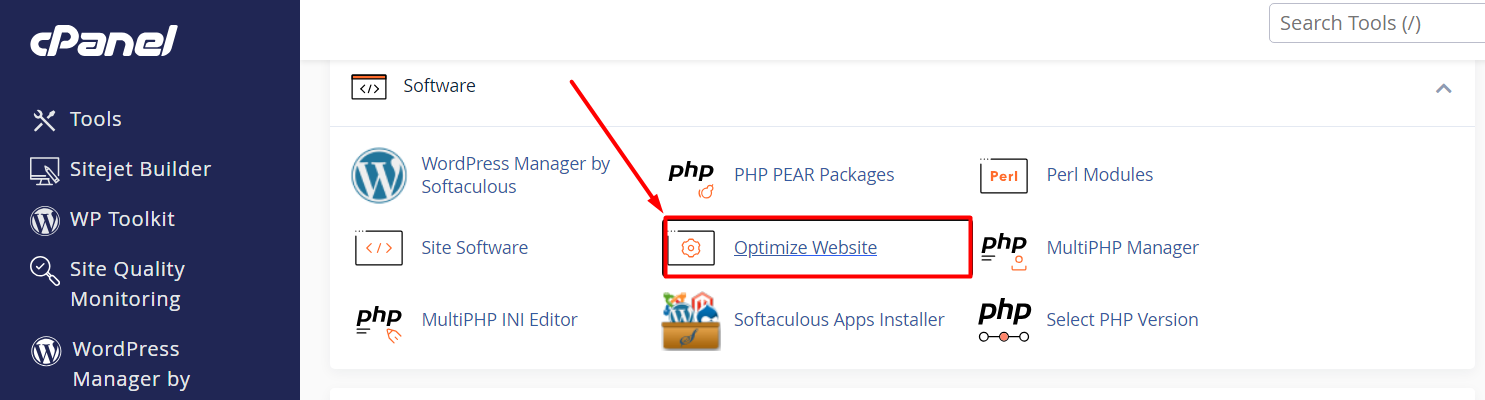
Open the Optimize website interface by clicking on the link which is under the ‘Software’ section.

Optimize Website in cPanel


STEP 2: Compressing types

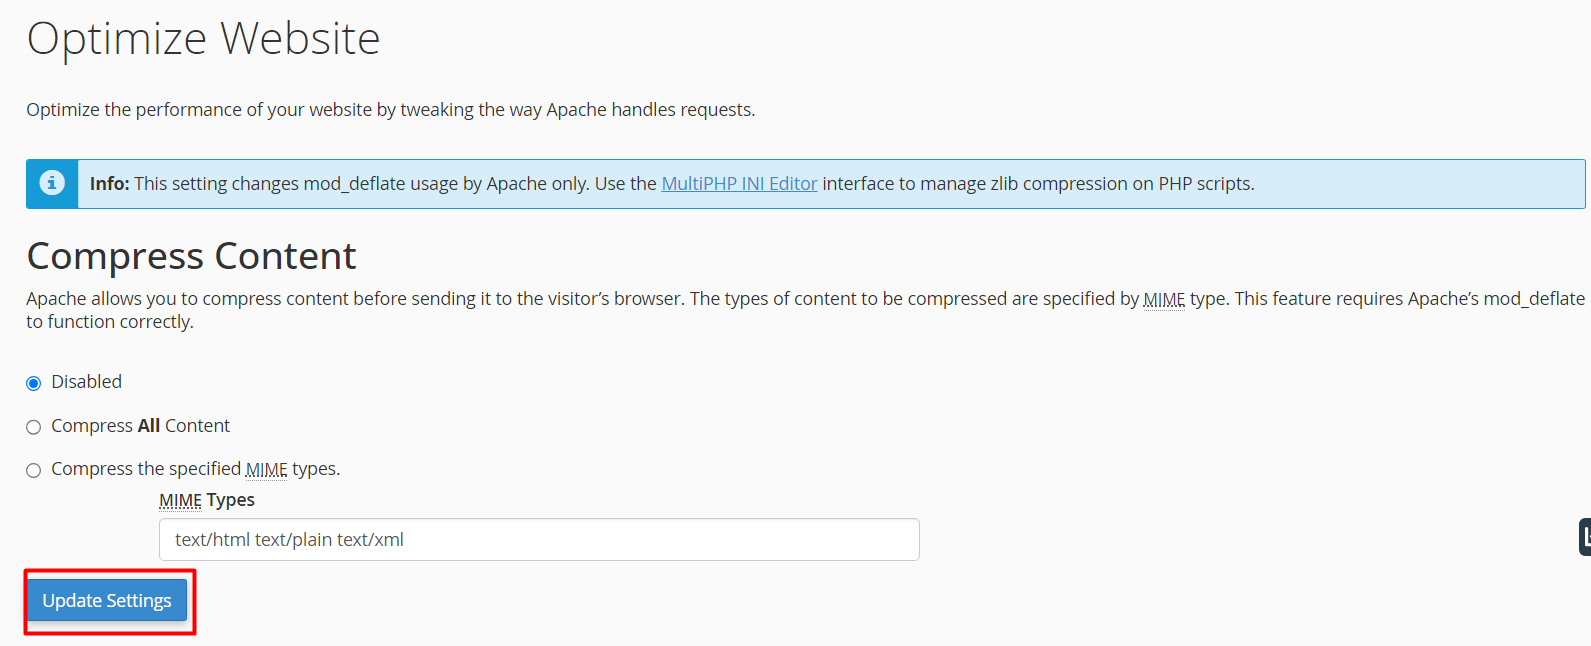
In “optimize website“, you can Compress the Content.

In the given options, you can choose any one of the following.

Compress Image in Content


Disable – It is used to disable the gzip compression.

Compress All Content – Used to enable gzip compression for all content in your website.

Compress the specified MIME types –  It provides the types of MIME(Multipurpose Internet Mail Extensions) in the text box. MIME are similar to the file types. It has both the file type and file format information separated with a slash.

Example: text/css, image/png, image/jpeg etc.,


STEP 3: Updating the settings

Click on ‘Update Settings’ to update it.


[Tweet “How to Optimize Website Using cPanel?”]

If you are a registered user in SeekaHost and have any queries to be clarified or issues to be sorted, you can raise a ticket through client area dashboard or email to support@seekahost.com. For immediate interaction or guidelines, contact our support team available in LiveChat at the right bottom corner of the website.

How to Use Website Virus Scanner in cPanel?

Website Virus Scanner in cPanel

A virus scanner is the most important feature in the application side and also even for websites, servers, etc., cPanel with a virus scanner is a huge advantage for the hosting users. This helps the hosting users to safeguard their files, folders, etc., from harmful threats. The user can also scan the different sectors of the home directory by using the antivirus.


Scan Account with Virus Scanner in cPanel

STEP 1: Opening the Virus Scanner

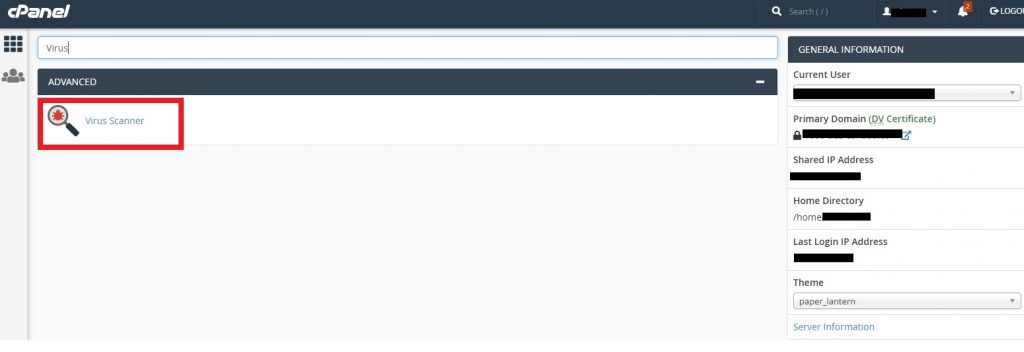
Type ‘Virus Scanner’ in the search box and click on it.

Virus Scanner in cPanel


STEP 2: Scan Now

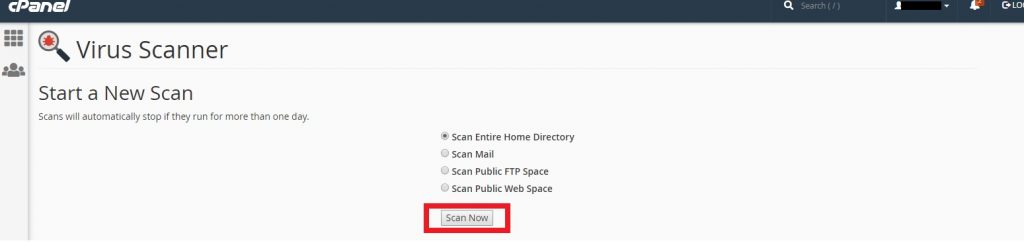
Choose the type of scan from the given options for scanning. Click ‘Scan now’.

Scan Entire Home Directory – This option helps you to scan the entire cPanel. If you choose this option, you don’t need to scan on other options.

Scan Mail – It scans your emails for viruses.

Scan Public FTP Space – It scans the public_ftp folder.

Scan Public Web Space – It scans the public_html folder, where all the end files reside.

Scanning cPanel


STEP 3: Completion of Virus Scan

After scanning, it notifies that the ‘Virus Scan is complete’ and ‘No Viruses found’. If there is a presence of malware, it displays the files which are infected.


STEP 4: Process Cleanup

You can remove the malware by checking the buttons under the option ‘Destroy’ and click on ‘Process Cleanup’. Now, the malware from your cPanel is totally removed.

How to do Password Protection for Directory in cPanel?

Password Protection For Directory in cPanel

We know that there are various features are available in cPanel. In this article, we are going to know a feature called ‘Directory Protection’ in cPanel. This directory protection feature allows the user to protect the directory with a username and password.  Below mentioned are the steps to create password protection for the directory in cPanel.


Configure Password for Directory in cPanel:

STEP 1: Directory Privacy

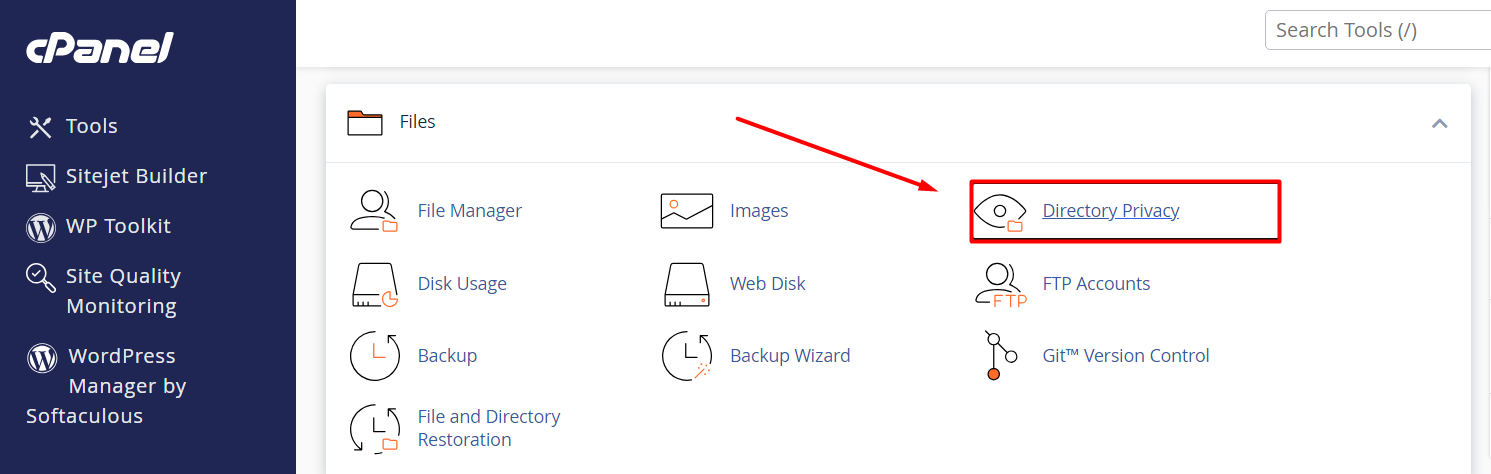
Type ‘Directory Privacy’ in the search box and click on it.

Directory Privacy in cPanel


STEP 2: Navigating Through Directories

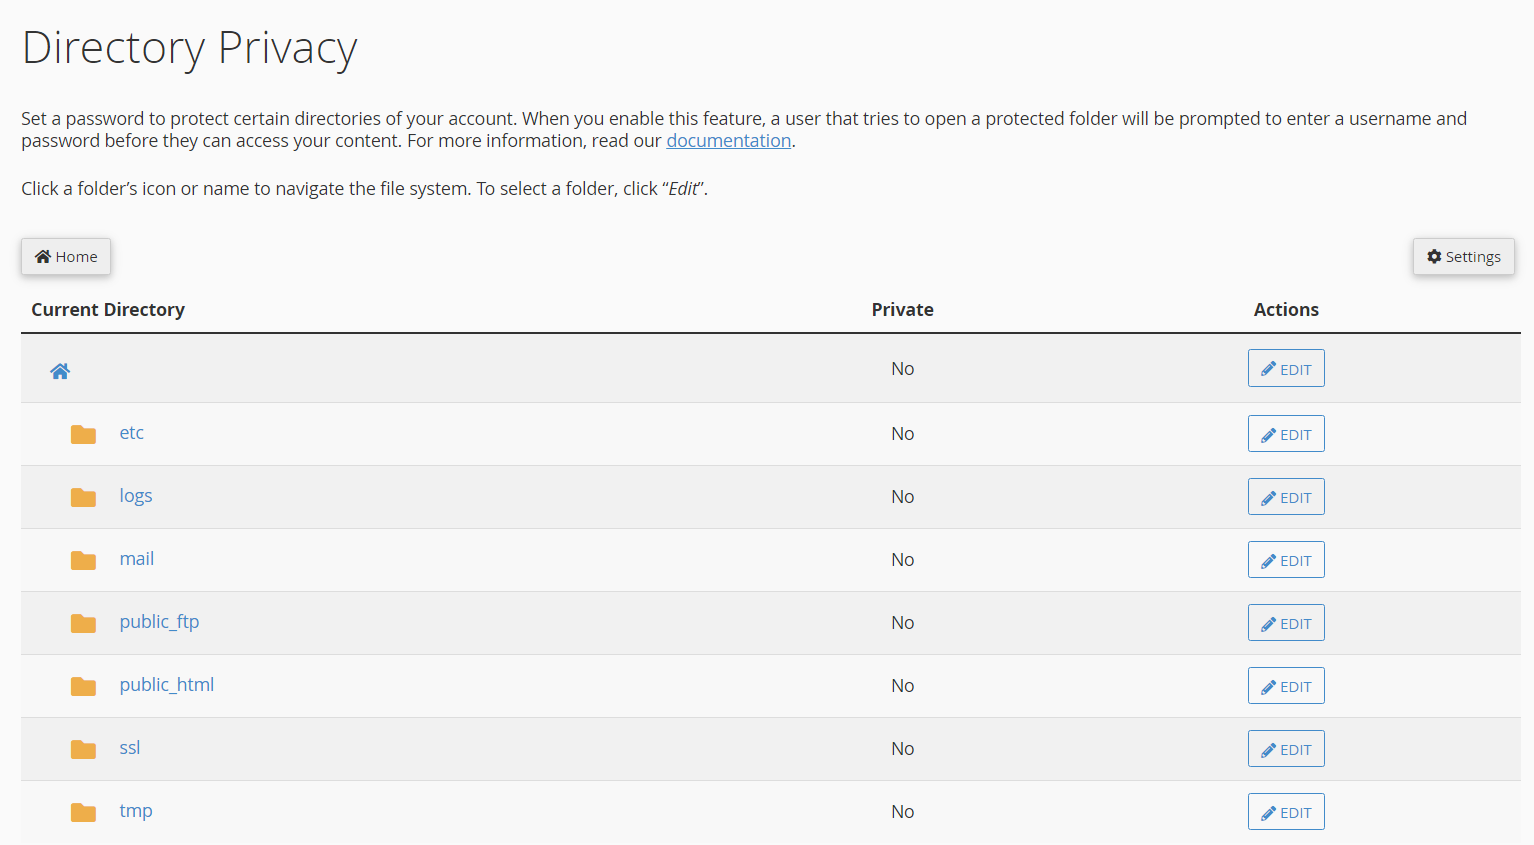
Open the directory privacy configuration and navigate through the directories in which you want to protect. You can simply click on the ‘icon’ to open the directory folder. Click on the name to select the ‘folder’.

Directory Privacy - Select Folder


STEP 3: Edit the Directory

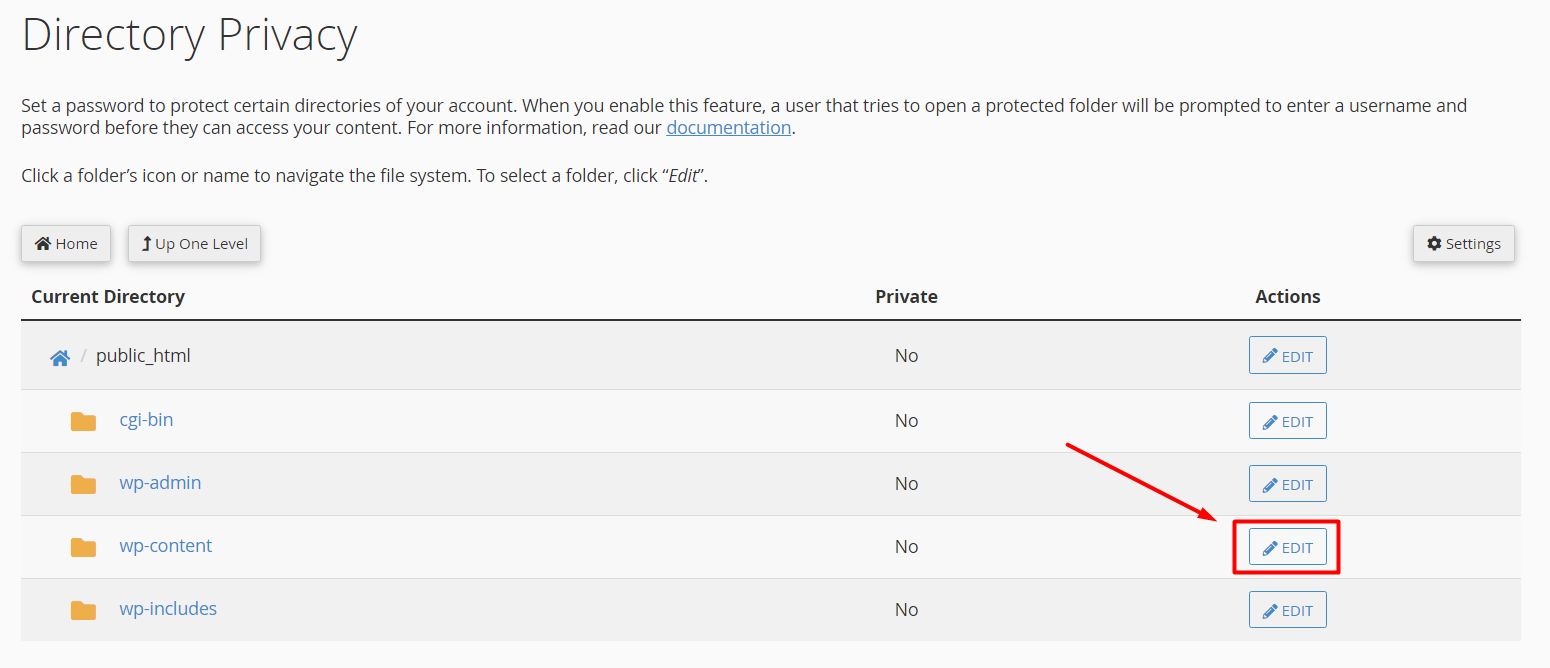
Click “Edit” action near the directory which you want to protect to configure the password for the directory.

Edit Directory - Configure Password


STEP 4: Password Protection for Directory

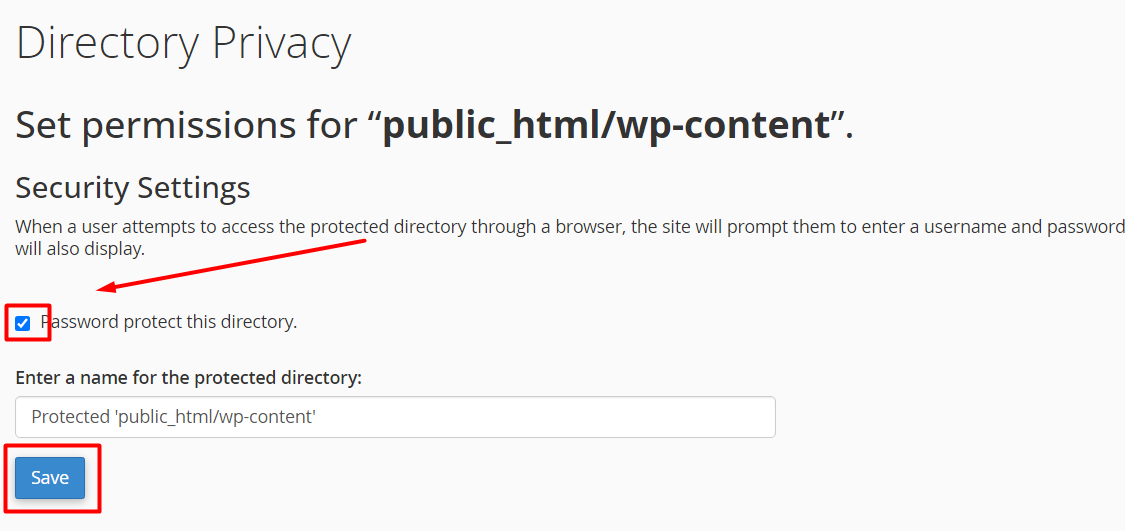
click the checkbox ‘Password protect for this directory’ and enter a name for the protected directory. Click ‘Save

Click Checkbox to create user password


STEP 5: User Creation for Directory

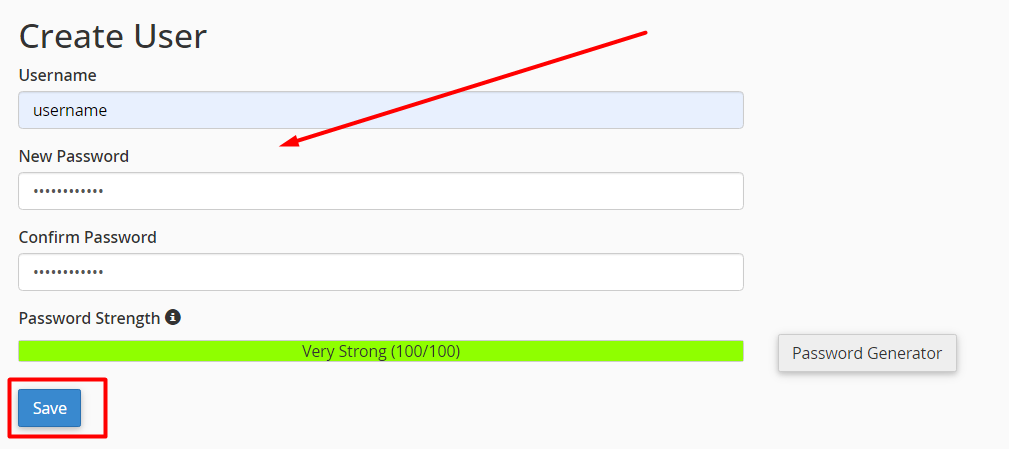
Under ‘Create User’ menu, enter the username and password to create a new user, click ‘Save‘.

Create User - Directory Privacy


STEP 6: Authorized Users

To see the added users, you can see the username under the section “Authorized Users“. You can also create more than one user here.


How To Increase Upload Limit Size (WordPress)? – cPanel

Increase Upload Size Limit for WordPress

You can upload any type of files in your site such as images, video, themes, gifs, etc., These files can be uploaded only when you have enough file upload size limit. If you have less size limit, then you are not able to upload the files in the site. This is a major issue faced by most of the WordPress and other CMS users. This can be easily solved through cPanel of your domain. In this article, you will know how to increase file upload size limit through cPanel MultiPHP Ini Editor.


Errors You Might Face When Because of File Upload Size Limit:

  • The uploaded file exceeds the upload_max_filesize directive in php.ini
  • 413 Error: Request Entity Too Large, Link you followed has expired
  • Fatal error: Allowed memory size of 12345 bytes exhausted (tried to allocate 2345 bytes) in /home/your-username/public_html/wp-includes/plugin.php on line 1000
  • Exceeds the maximum upload size for this site
  • Unable to create a directory and broken images in the Media Library


Steps in increasing the file upload size limit through cPanel.

STEP 1: Login

Log In to cPanel


STEP 2: MultiPHP INI Editor

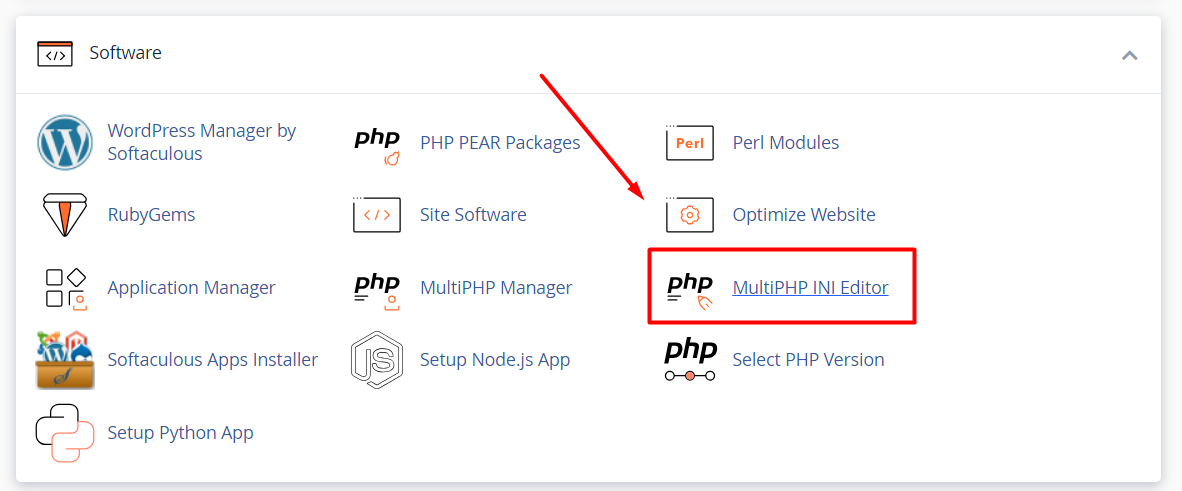
Search ‘MultiPHP INI Editor’ and click on it.

MultiPHP INI Editor


STEP 3: Basic Mode

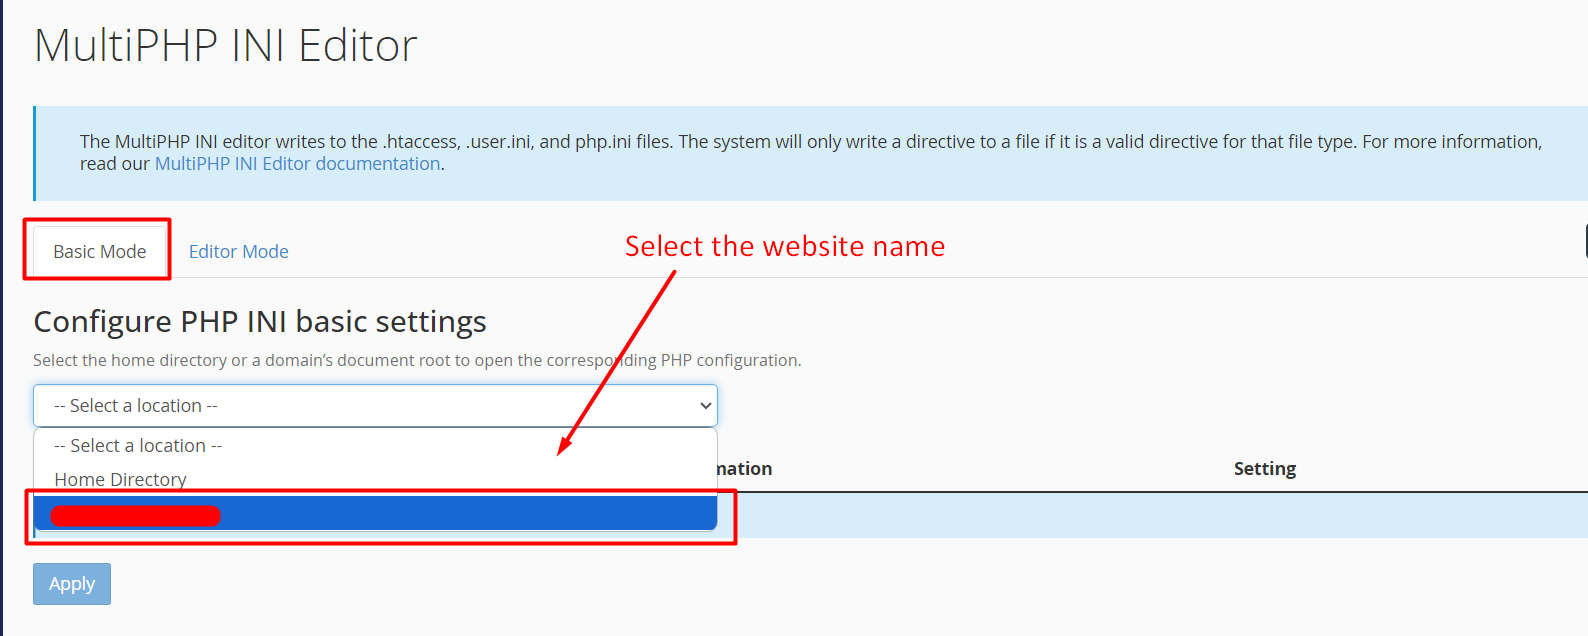
There you can see two types of mode available. Click on ‘Basic Mode’ and choose the location which is domain’s root document to edit their PHP configuration.

Basic Mode - INI Editor


STEP 4: Increase post_max_size and upload_max_filesize

By default the PHP directive values will be updated to minimum value required for a website to function the task. If you couldn’t see files (php.ini and user.ini) created in your public_html directory, then just click “apply” to create one to make it execute.

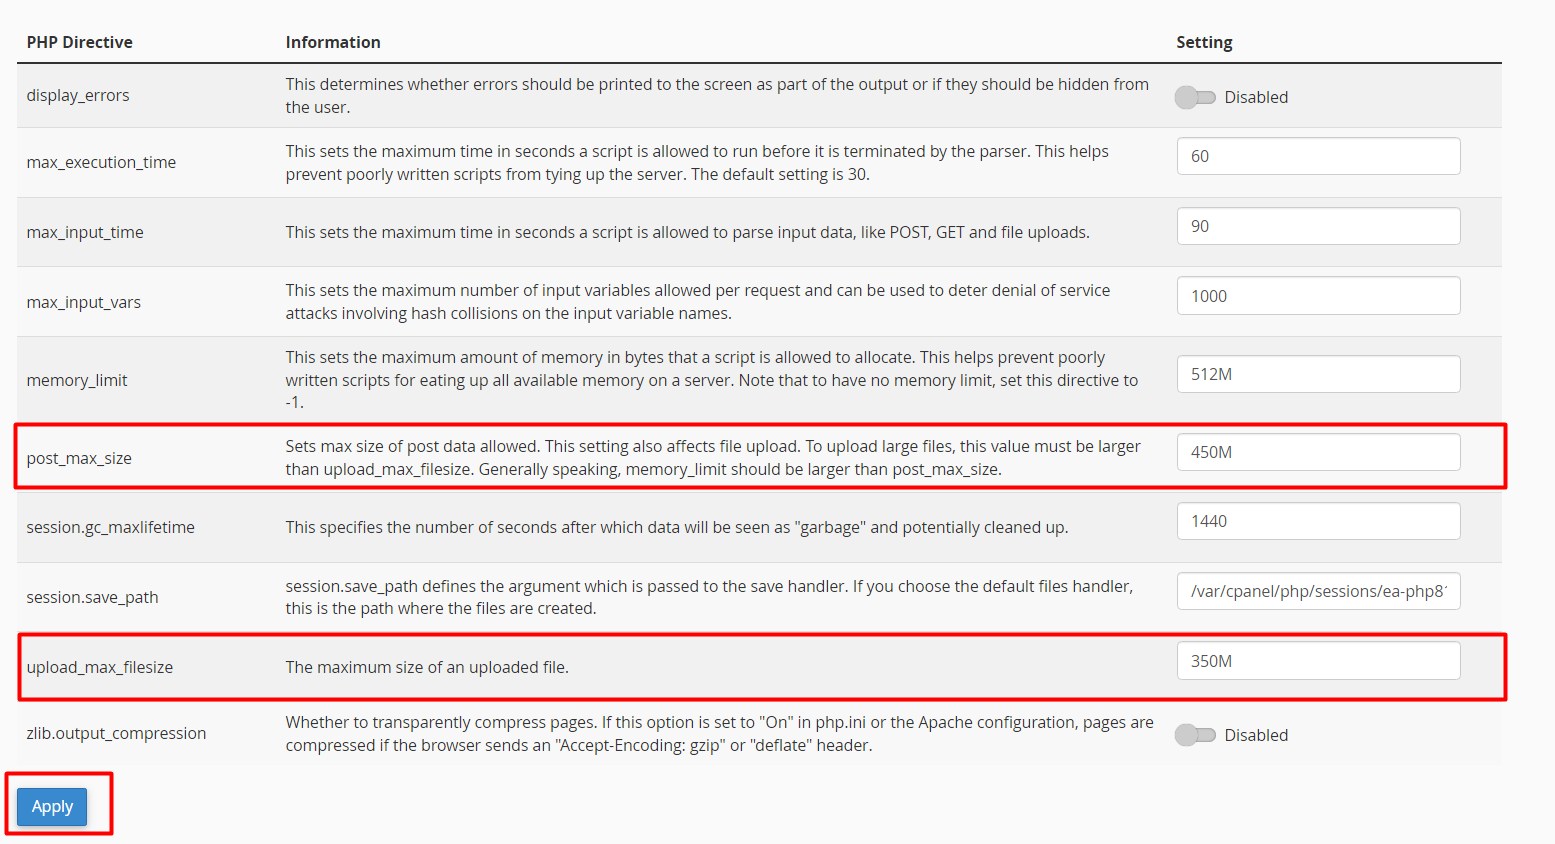
1. If you want to increase the values in upload_max_filesize, just update the value in the setting box.

2. Then in the “post_max_size directive“, enter the value larger than the ‘upload_max_filesize’.

For example, if your upload file size is 100M, then “upload_max_filesize” value should be 100M and “post_max_size” directive has to be “101M

3. Make sure the PHP memory limit is higher than the post_max_size and upload_max_filesize.


Upload_max_filesize and Post_max_size Increase


STEP 7: Save Changes

Click on ‘Apply’. The settings will be saved.

Thus, these are the steps involved in increasing file upload size limit through cPanel.


[Tweet “How To Increase Upload Limit Size (WordPress)? – cPanel”]

Step By Step Guide to Create Addon domain in cPanel

Create an Addon Domain in cPanel

Instead of managing websites under different server or cPanel, you can now manage them under single cPanel account by create addon domain in cPanel. Once you add an addon domain, you can manage both main domain and addon domain in cPanel while using the same resources allocated.

Let’s guide you with step by step to create addon domain in cpanel.


What is Addon domain?

Addon domain is a separate domain hosted under your primary domain. Addon domains have the full functionality as like primary domain.

You can create email addresses, forwarders, and more the same way as a primary domain on the account.

One of the main benefits for Create Addon domain is that you can manage multiple domains in a single account.

Content and Files for this addon domain will be stored as a unique folder within the public_html. This domain will be created in the cPanel account.

How to Create Addon Domain?

  • Login to your cPanel Account with the access given by your web hosting providers.
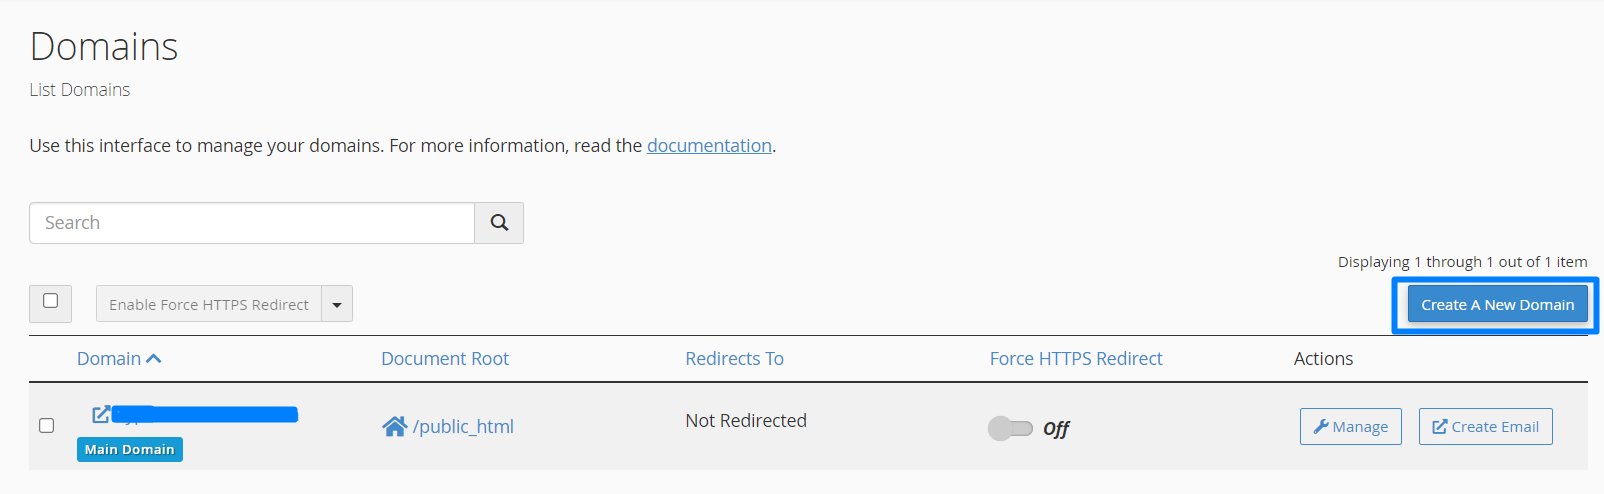
  • In search, enter “Domains” and click “Create a New Domain” as shown below.

Create a New Domain


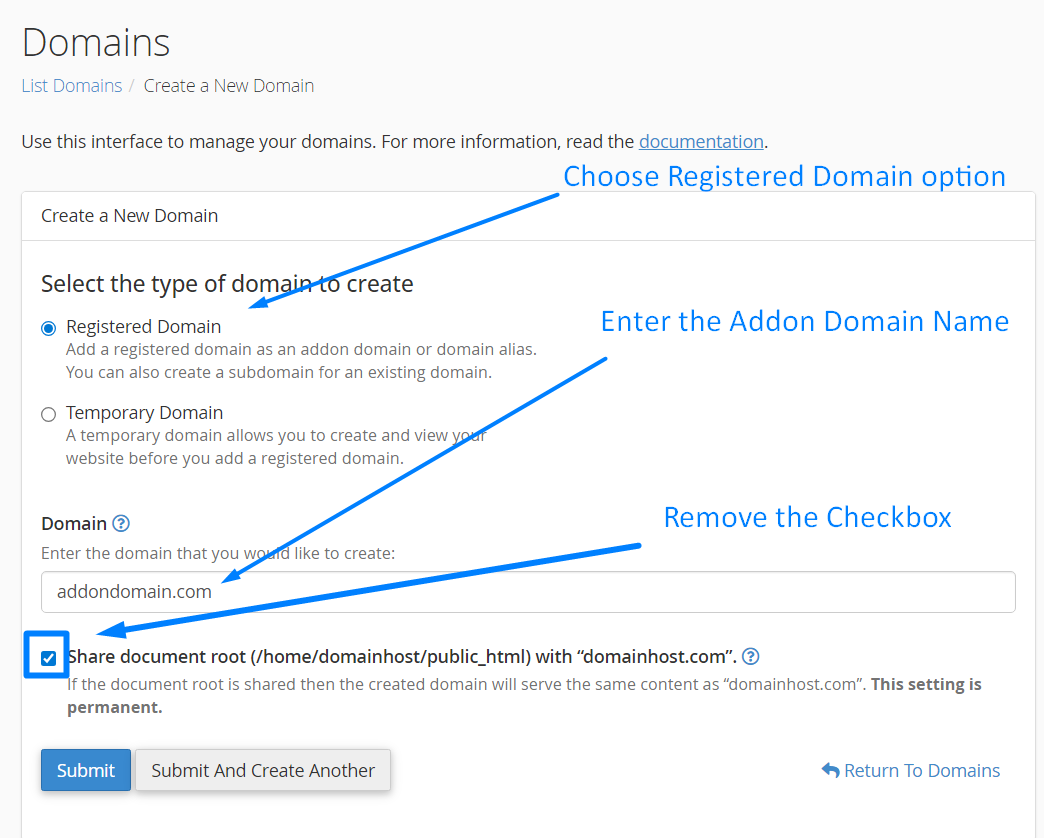
  • Enter the domain name that you want to Create Addon domain in the text box and uncheck the checkbox near “Share document root”. 

Addon Domain - Checkbox Remove


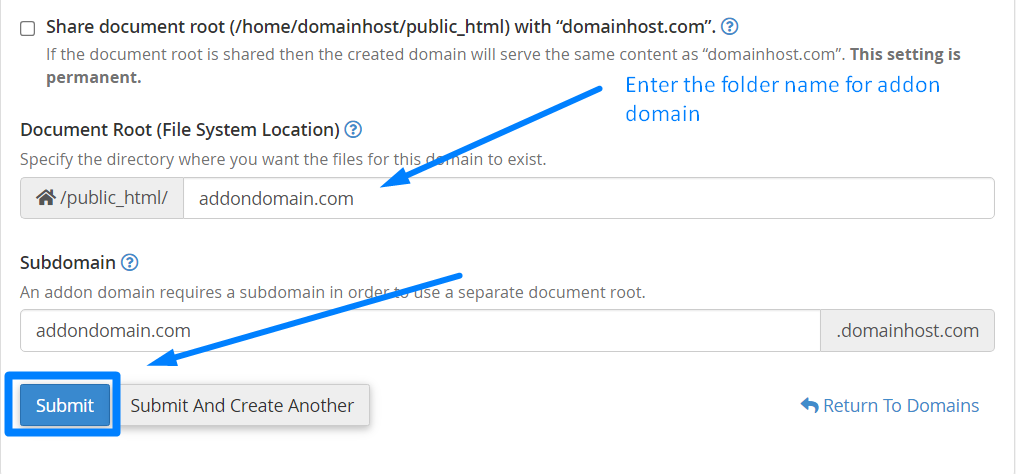
  • Under the Share Document Root Section, enter the folder name to set as root path where the addon files should be stored. Click “submit” button.

Document Root – Enter the Folder Name (Leave it to automatically take as addon domain name)

File Path for Addon Domain


  • Now you can created both addon domain for the addon domain.


 How to modify Addon domain account?

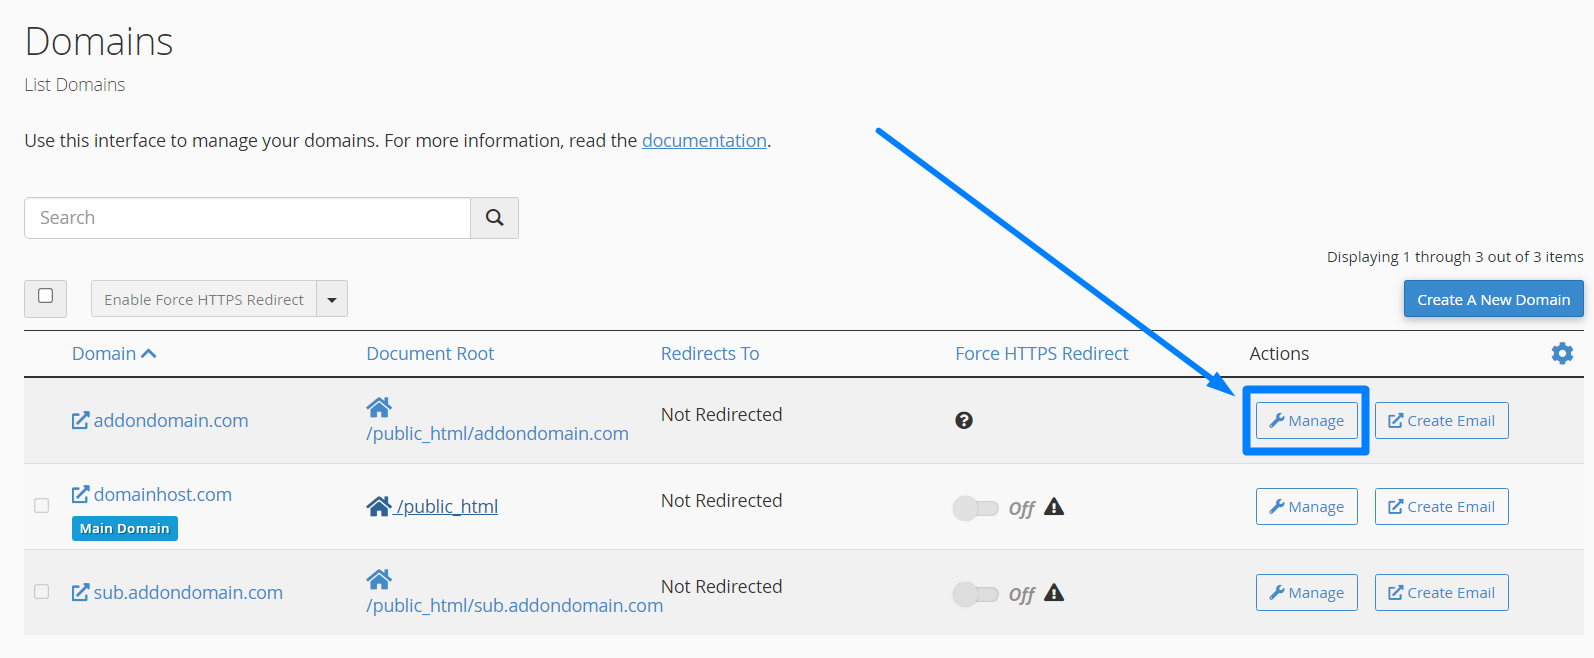
  • If you want to modify the destination path for addon, go to domains section in cPanel -> Click Manage button near the domain name.

Manage Button - Domains


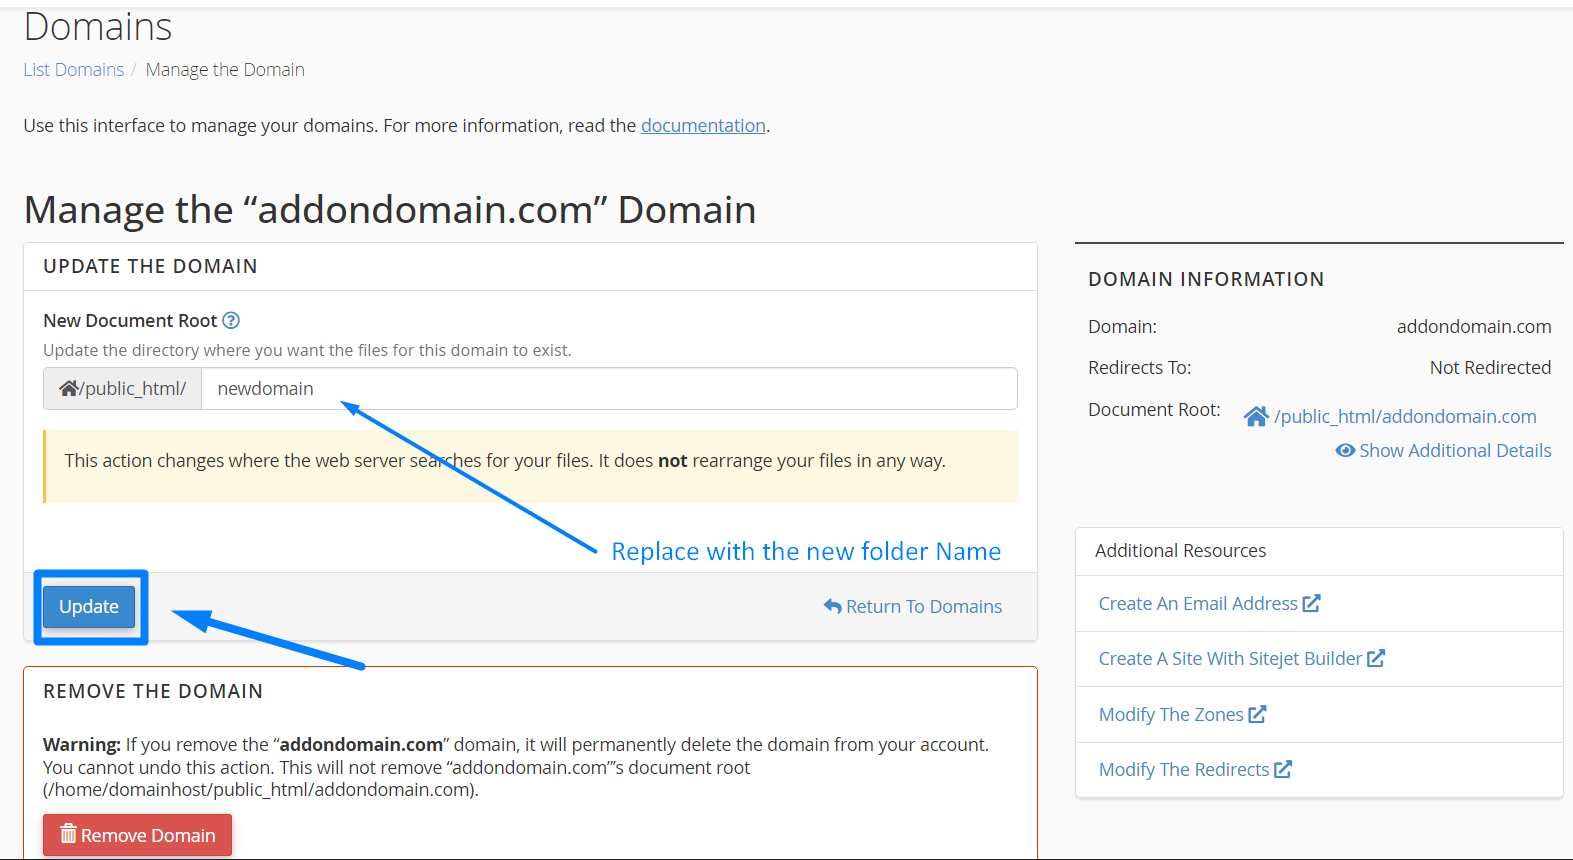
  • Here, replace with new folder name which will be automatically created as folder inside public_html. If you already have any files inside the old folder, you should copy/move the files to the new folder.

Update Folder Name - Domains


Remove Existing Addon:

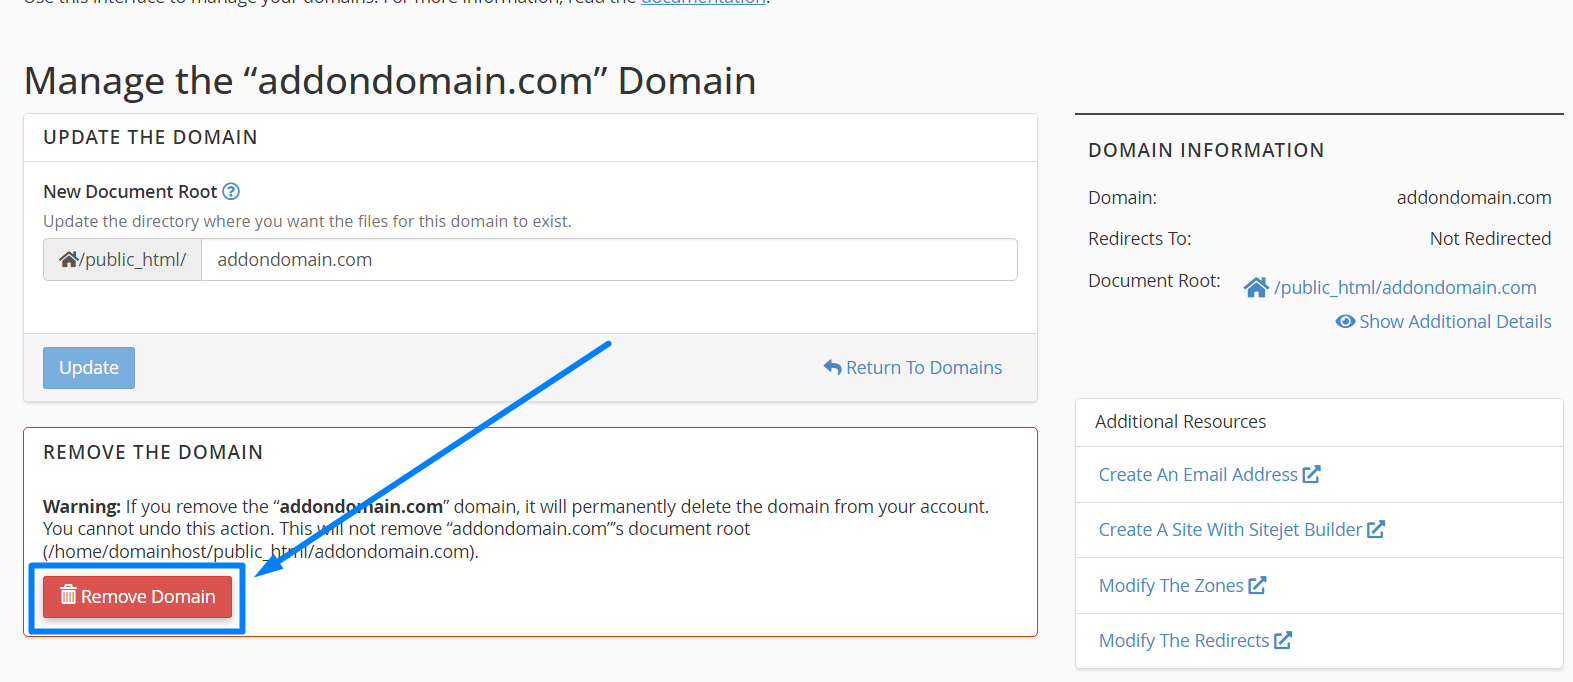
  • In the same page as mentioned above, click Remove Domain button to remove from the domains section.


Remove Domain - Domains

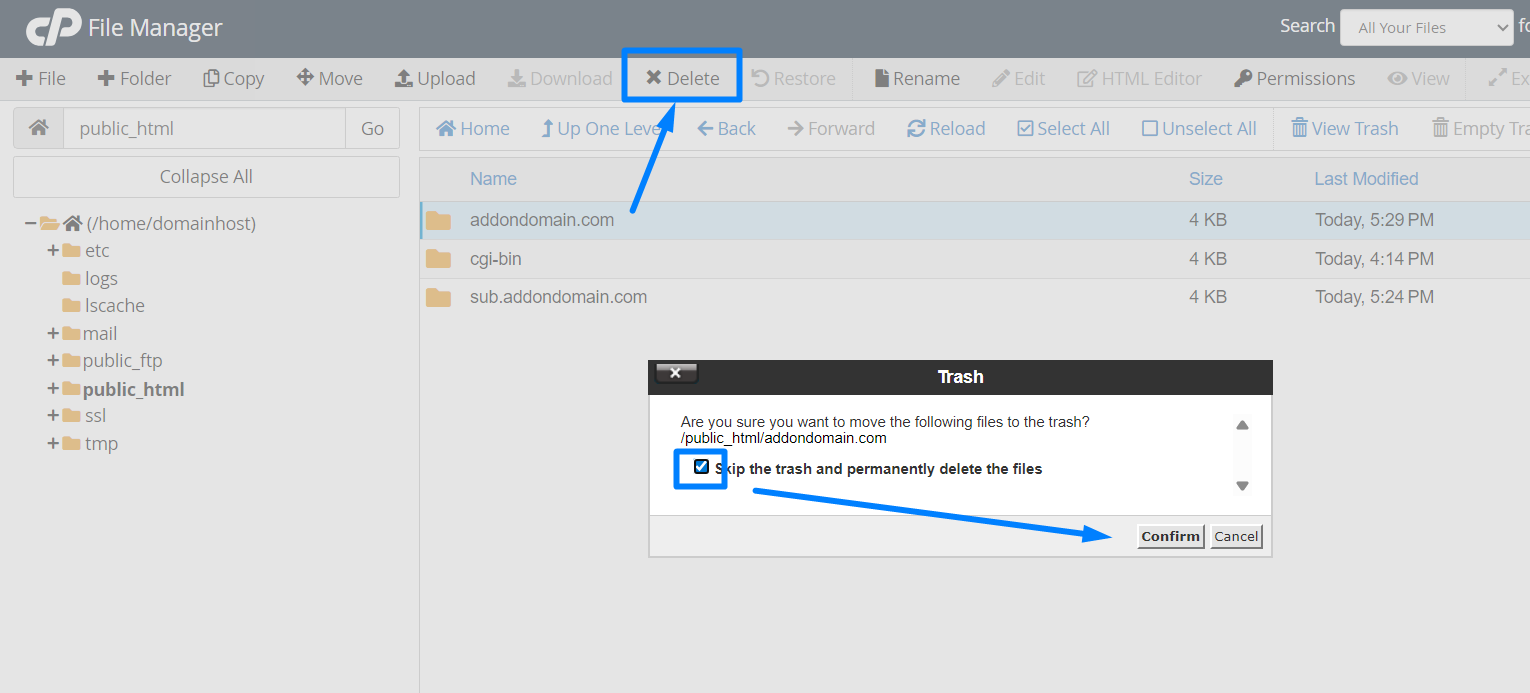
  • Once removed, go to File manager option in cPanel -> public_html and locate the folder name. Now remove the Folder to completely remove the addon from cPanel.


Delete folder in cPanel


Install WordPress for Addon:

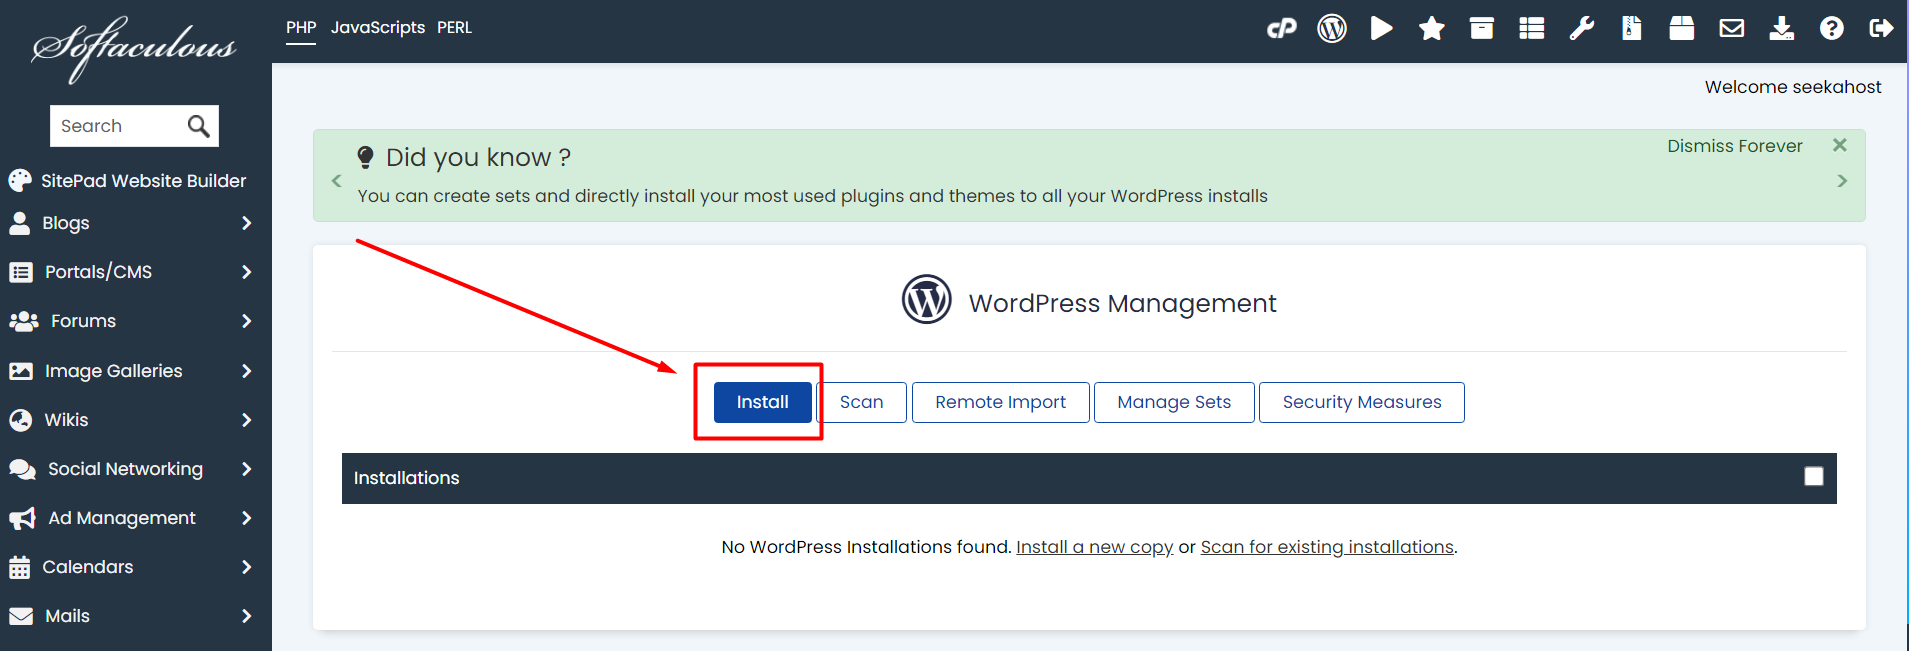
  • To install WordPress for the addon domain, click the “WordPress Manager by Softaculous” option on left side. Now click install button.

New Installations - Softaculous


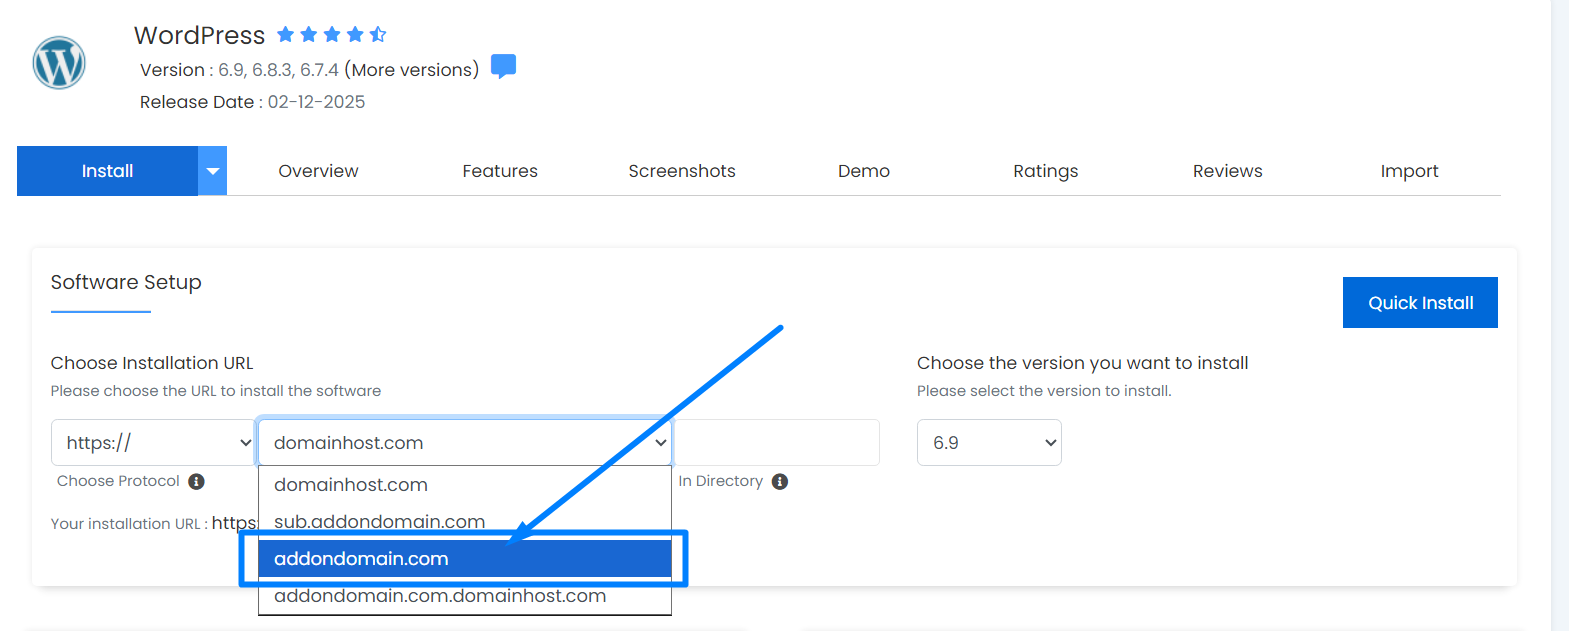
  • Now choose the addon name from the drop-down as shown below,Install WordPress for Addon Domain


  • You can view the WordPress files under the addon domain folder inside the public_html directory once installed.

NOTE: Create Subdomain in cPanel.


Unable to Create Addon Domain:

If you are facing any issues while Create Addon domain then it should be because of the below-mentioned reasons.

  • Before adding the domain, main domain nameserver must be updated for the addon domain. Only then, you could be able to add the domain on the cPanel.

For example, if the nameserver for the main domain is ns1.seekahost.info and ns2.seekahost.info, then the same nameserver must be updated for the addon domain in your domain registrar also.

  • Ensure you have Addon Availability in your cPanel Account. On the right side of your cPanel dashboard, you could see an option like Addon where you can see the allocation.
  • Check whether you have utilized the 100% disk usage or still you have enough space to create Addon Domain. If your disk space is more than 95%, you will face the issue in Create Addon domain.
  • Make sure you are not using the reserved domain names while Create Addon domains.

If you are still facing issue in adding the Addon domain, please contact SeekaHost on 24×7 Live support and share us the error screenshot.

Our experts will help you in solving it immediately and you can proceed with that.

[Tweet “These are the step by step guide to create Addon domain in cPanel”]

How to Install Free SSL in cPanel?

ssl certificate

Before getting into the topic “How to Install AutoSSL in cPanel?” we should be clear about why we need to install SSL for the websites?

One of the most important backbones of online business is just creating a secured and trusted environment.

So an SSL certificate creates a foundation of trust by providing a secure connection. It creates a secured connection between the client and a server. SSL encrypts the data/information sent across the internet.

This is because; the information that you sent on the internet will travel from one computer to another computer to reach its destination place.

Anyone in between you and the server can be able to access your data/information that passes through the internet if it’s not encrypted. If you installed an SSL certificate for your website, the information that you send through this site will become unreadable except the destination server.

security

Auto SSL

AutoSSL is one of the best features in cPanel & WHM. By using AutoSSL, it automatically installs and renews Let’s Encrypt SSL certificates for every domain. SSL Installation and Renewal is one of the complex tasks. So most of the web hosting providers comfort the clients with Auto SSL to do the tasks easily. Here, you don’t want to fill out any forms or install the certificates manually. Once you enabled AutoSSL, your websites will be automatically secured free, domain validated SSL certificate. AutoSSL will not force the site to load in https, it needs to be changed manually.

Here, I have explained you how to enable AutoSSL in cPanel.

How to Install Auto SSL in cPanel?

  • Login to the cPanel Account.
  • Under Security section, click SSL/TLS Certificates option.

SSLTLS Certificates - cpanel


  • Click “Wizard” tab.

SSL certificate wizard option


  • Click all the checkbox near each domain name or select only main domain and *.domain so it automatically take all subdomains. If you are configuring only for main domain and few subdomain, then you can select only those domain names. Click Continue button.

Select Domains for SSL certificate


NOTE: If you select wildcard domain, then it will configure automatically for any subdomain you add later under the main domain in cPanel. If you remove and readd the same subdomain, it will not cover the subdomain so you have to select the subdomain and install SSL separately.


  • Now click Let’s Encrypt Certificate button.

Issue Certificate SSL cPanel


  • Now in the popup window, click checkbox to accept the terms of Let’s Encrypt. Click Continue button.

Let's Encrypt SSL Accept Terms


  • Now the SSL certificate will be installed in the cPanel for the website.
SSL certificate Installation


  • If you add subdomains after installing the certificate, then the subdomain will be automatically covered under the existing certificate if you have selected the wildcard domain option while installing the certificate.


  • If the website loads with both http and https but you want to load only withhttps, kindly update the URL in phpMyAdmin -> Database ->  wp_option and update the website name with HTTPS.
  • Also do force redirect on the “domains” section for the domain to redirect the website from http to https if visitor visit the website on http.
Force redirect SSL
Helps visitor to visit secure website and increase the trust.


  • If you want to uninstall the SSL certificate, go to Installation tab


  • Now click “Uninstall” option near the installed certification.


Things to Consider for SSL Insecure Error:

1. If you pointed the A record or nameserver for the domain to the hosting provider, wait for 24 to 48 hours before install or Auto run SSL for the website.

NOTE: If your website is hosted with SeekaHost, SSL will be automatically installed within 12 hours after updating the nameservers—no need for manual installation.
2. Check Disk Usage exceeded for the website in cPanel. If exceeded, then remove bigger size files to reduce the disk usage and install SSL.

3. If disk Usage not exceeded, then check File usage/Inode count exceeded for the website in cPanel. Remove more number of files to reduce the count and install SSL.

NOTE: If you don’t see such option, then contact the hosting provider to enable that option.

4. For website loading with both http and https version, make sure you have enabled “Force https redirection” toggle on under domains option in cPanel to load only in https version.

5. If your website redirects to another website when load with https version, then check if any of your files is mentioned with http version. If not, install Really simple SSL” plugin and configure to avoid mixed content.

6. If your website is pointed through Cloudflare and showing an SSL mismatch or insecure error, ensure your Cloudflare settings match your hosting server. Follow our step-by-step guide on How to Update DNS Records in Cloudflare to configure your SSL/TLS settings properly.